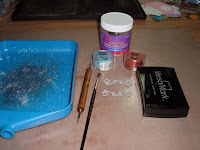
Supplies: grungeboard or chipboard pieces, versamark, UTEE, small brush, perfect pearls, small stylus or tweezers to hold the piece while heating. Smoosh your grungeboard piece into versamark until it is coated really well. Place it in the bead tray and cover with UTEE. gently dump off the excess.
Use the stylus or tweezers to hold the piece still and begin heating - start with your gun high above and slowly move it down as it begins to melt, once it melts you can get closer. Aim your gun away and sprinkle on more UTEE into the soft UTEE until you get a good solid coverage. Let it cool slighty - this is a bit of trial and error - and then brush on the perfect pearls. it will stick to the UTEE. once it is covered heat it just a little bit so the perfect pearls sticks-you will see a slight change. sometimes i add another layer of perfect pearls so it is good and shimmery!
have you seen the new grungeboard coming out???? i am SO excited about it! nature shapes and holiday shapes PLUS grunge BOOKS!!! you can preorder on my website.


No comments:
Post a Comment