Showing posts with label christmas. Show all posts

Monday, December 26, 2011

one last christmas hurrah!

hi all!

ahhhhhhhh christmas - DONE!  hahhahhahh!  we had a great christmas but i am ready to move on!  here are a few highlights:

pezza was up at 3:45.  NOT because it was xmas - she didn't even remember.  nope just because some days thats how she rolls (lord help me).

we gave trevor money.  hubby put it in a justin bieber folder, wrapped it in pink snowman paper and had me write the to/from across the front with pink stickles - awesome! hahahhahhhaha

1 of my presents for pezza and hubby was a set of nerf guns.  silly me did not think of getting anything to defend MYSELF with.  as i was cleaning up the wrapping paper and such i hear pezza mumbling behind me "i've got my gun...i've got my dart...i've got my extra darts...i've got my momma target..."  HEY!

then trevor arrived and immediately goes for one of the guns and starts chasing his sister around and they run upstairs.  after awhile me & hubby are getting suspicious - sure enough an ambush arrives.  however trevor has BOTH guns with pezza following behind.  he tells us she has been demoted to "ammo mule" - ahhh older siblings....

she got a bejeweled game for her nintendo DS - hubby and i are totally addicted.
i have two more christmas cards i wanted to share - really i wanted to share them BEFORE christmas but things got a little crazy!  i posted my pearl mist video and talked about using the perfect pearls and water alone but you can also make shimmering colors to match your projects easily!  all you need is to do is add a few drops of your DYE reinkers to the water and perfect pearl mixture - any dye based reinker works.  this means you can adjust your shimmer color AND mist color!


On this card I used the Perfect Pearls and water on the polka dot paper and then added some cranberry reinker to mist a piece of white paper for some shimmering red.


here you can see the gorgeous cranberry color mixed with gold shimmer - i love that i can control just how much color i will have this way too - most pre-made mixes have a bit too much color for me!  i used a crafter's workshop stencil and gold viva decor modeling cream to add the leaf design.

this image is from lala land crafts - isn't she adorable?!  i colored her with colored pencils and then added some twinkling H2Os for extra shimmer.

I also made a pale blue shimmering mist


on this background i used viva decor crystal gel sprinkled with ultrafine glitter while wet and got some amazing snowflakes!

my image is a Peachy Keen i have had for several years - i just LOVE him.

he is also colored with colored pencils.  the embellies are cut from felt (from Felt On The Fly - ALWAYS) using spellbinders dies and then a fabric yoyo in the center.

here are some xmas pics for ya:

pink!
 sibling love
 christmas cat
 done
 the haul
it will take pezza all week to get to all her presents i think!  so far what she has played with, she has played with for a long time so i think that's a good sign!

i hope you all had a wonderful christmas and i am really looking forward to spending another year with you!  i have been so blessed through this little blog of mine and am so grateful for the friends i have made and the opportunities that have come my way!

Wednesday, December 21, 2011

pearl mist video!

hi all!

posting from the depths of christmas prep hell!  anyone else???  marathon baking yesterday.  i have decided i despise cake pops...alot...and stores that run out of things before christmas...like white candy melts.  thus snowmen cake pops with sprinkles....at least pezza loved them!


we headed in to DC this past weekend for hubby's work christmas gathering.  we sat with my two fave couples and i had lots of fun.  i love DC and don't get out there like i used to since pezza was born.  can't wait until i can take her to the smithsonian museums and stuff.  used to love doing that with the boys.

but onto my project - today's fun includes a video for ya!  i LOVE LOVE LOVE perfect pearls mica powders by ranger - they are the BEST for so many things!  and a great one is making your OWN shimmering pearlescent mists in ANY COLORS YOU WANT and the video at the end of the post shows you all about it.  it is sponsored by FaveCrafts.com - a super place to browse for all sorts of free tips, project instructions and info.  You can mix up your pearl mists two ways - one is just perfect pearls and water in a mini mister - all shimmer in whatever color PP you use but no heavy color.  i really love to spray this mixture onto regular patterned paper so i get shimmer paper!  that is what i did on the dark green strip on these cards - i sprayed the full page and then cut it to use on all of the cards:

really hard to catch the shimmer on camera though :(

i used papers from the same paper pad so they would all coordinate and kept the overall design simple for mailing and for quickness!

the images are just right stamps from like 2 christmases ago that i HAD to have when they came out and did not put to good use.

i colored them with colored pencils of course

i really had fun coloring up these little images - quick n easy!  here's the video - be sure and leave a comment so i know what you think of it!


Saturday, December 17, 2011

marshmallow chocolate stirrers...

hi all!

well pezza finally got to experience the childhood glory that is chuck e cheese.  frankly i have been putting it off as long as possible.  having already raised 2 kids i have spent more than my fair share of time in the torment & insanity that is CEC.  in fact one of the things i told kevin when we decided to have pezza was that HE would be handling ALL CEC parties.  yea guess who had to work last night....to be fair the party was early, 4-6.  so off we went to have some fun.  and i have to say it was a remarkebly good experience - the FIRST in CEC.  for one thing it seemed much bigger and less crowded than the ones we visited in the past.  in addition it was nearly empty - that is the true blessing!  so pezza got to try out some fun games and stuff and everything was only 1 token.  i remember in the arcades when the boys were younger games were costing 2-3 even 4 quarters each.  she even played skee ball - pezza flingin hard balls willy nilly - saw my life flash before my eyes several times.  the one big disappointment was how many of the games were broken - especially the ones with no sign on them so you didn't find out until after it took your token - really annoying.  overall a fun time though.  we brought one of her friends home with us and listening to the conversation in the back seat was hysterical.  he is obssessed with dinosaurs and was talking about a show called kung fu dino posse.  really????  every time he said the name in his very serious little 5 year old voice i was cracking up!

what other fun thing did i do yesterday - dipped marshmellows.  for those who missed it on facebook:

yea.  there was a bit of a learning curve with this.  don't be fooled.  it was not as simple as melt chocolate, poke marshmallow, dip, add sprinkles.  oh no.....for one thing i melted my candy melts TOO long and guess what happens - they go PAST the melted stage and back to the hard stage - very odd.  BUT i remembered a tip about doing this for cake pops on my buddy cat's blog - add some crisco too thin out the coating for a smoother look.  *frantic search for crisco i KNOW i have more of SOMEwhere*  ok.  got it all nice and melted and thin, dipped my candy cane tip in , pushed it into the melted candy, swirled it around and stuff and realized - IT WAS TOO HOT - my marshmallow was MELTING!  dip it in sprinkles, throw it all dripping and gooey onto the parchment lined cookie sheet.  yea that will be a hit in the treat bag - NOT.  so i added more crisco and let it cool down a bit before continuing.  dip in chocolate, dip in sprinkles, set down and watch all the excess pool off onto the parchment and cover the sprinkles.  dip, TAP OFF EXCESS, dip in sprinkles, set down, fall over.  pick up. fall over.  pick up. fall over and knock next one over too, get candy melt all over candycane.  i am having SO much fun. gonna be real proud bringing these into preschool.....but i kept going!  i wish i had found peppermint sticks but all i had was candy canes so breaking off the curvy part was an adventure all it's own.  so my sticks are all different sizes.  i was concerned at first but i quickly realized it was the least of my problems.  i did finally get most of the kinks worked out and the 3rd & 4th rounds turned out much better:

so here are my pointers in one easy to find place:
  1. when melting the candy melts add crisco - add and stir it in until the coating is pretty thin and runny - not water but just so you can dip and get a nice smooth even thin coating.
  2. melt them in a container deep enough so you can just dip them straight in and cover them completely - i used a one cup measuring cup and melted about 3/4 cups of candy melts.
  3. set it aside to cool a tiny bit whie you get your candy canes, marshmallows and sprinkles ready - i only did 9 of each so it worked out well.  don't set it aside for so long it hardens :)
  4. set the marshmallows on a plate, dip the tip of your candy cane in the melted chocolate and then push it straight into the marshmallow WHILE it is sitting on the plate. - that is the only way i could be sure mine would be straight and stand up.  let that set up a bit.
  5. dipe the marshmallow into the chocolate, take it out, tap gently on the side of the container to get the excess off then roll in sprinkle that are in a small bowl.
  6. set on parchment paper.
not really hard once i figured a few things out!  stay tuned for the final project with these - goodies for pezza's classmates and a few of my neighbors!

Thursday, December 15, 2011

lotsa {christmas} cards

hi all! 
(weird - my post posted itself all on it's own while i was typing....i apologize if you have to read this twice.)
hi all!

we had a great time at the cookie exchange party tuesday!  hollyn loved playing with all the kids and i loved seeing friends i don't see nearly often enough these days.  we came home with some yummy treats of all kinds and we also did an ornament exchange which was really fun too.  apparently this is not a new way to do things but it was new to me - everyone had numbers.  when it was your turn you could either pick a wrapped ornament from under the tree OR steal someone else's ornament they had already unwrapped!  too fun!

then yesterday we got together with some folks at the skating rink - wednesday morning they have a session for littler kids with push toys and ride on toys and bikes and such.  we used to go alot but the rink was closed down for quite awhile for major renovations.  i tried to get pezza to bring her bike to practice on a nice flat area but she refused.  instead she chose to bring a baby and a doll carriage (WTF?) and spent the entire time trying to get a turn on other kids bikes cuz she wanted something to ride.  unfortunately some were not interested in sharing with her so it was a whole lot less fun than the cookie party :P

also went for my third chiropractor visit - my headaches are improving some but when they hit they sure hit hard!

and in the midst of it all i made 7 more xmas cards to show you!


I used my ALL TIME favorite cricut cartridge and my Imagine - Snow Angels.  i love EVERYTHING about this cartridge - the colors, the patterns, the images, the shapes.  i got this after christmas last year and couldn't wait to make cards with it but i was having a lot of trouble callibrating my machine.  it's still not quite right but good enough to make the cards if i turn off the borders.

I chose all of my main shapes and then edited them so they were 3.5" and separated into layers.  this way i could stack the layers with foam tape after inking the edges to give the cards some depth and dimension - much more interesting than the flat one layer image!


after doing my main images i worked on my patterned papers - SO EASY with the imagine because they are all on one cart and totally coordinate!

i did not print out entire pages, which is an option on the imagine.  there would be too much wasted paper and ink that way.

instead i chose a 5"x7" rectangle from the stock shapes on the imagine and then added various patterns to it - i printed 7 altogether, 1 for each card. 

my cards are 5.5"x4.25" so i knew a 5x7 piece would give me plenty to cover the card front.


the extra i cut off was perfect for a smaller panel on the front of each card!  i ended up with VERY little waste!

next i dug around and found perfectly matched cardstock to use for the card base, the mat for the smaller panel and the nestie mat for each ornament - i rarely print solid colors.

i used a different edge punch on each mat and a different nestie on each as well and then put it all together!

this was a fun and relatively easy little project to do - it was somewhat assembly line since all of the measurements and the layout were the same without the boring monotony of making a bunch of cards exactly the same.

what do y'all think? 

Thursday, December 8, 2011

cmc challenge pencil style

hi all!

posting two days in a row woohoo!  i am sad to report we got NO snow last night BOO!  the first couple of snow predictions are almost always wrong though so i knew the chances were slim.  but a girl can hope right!?!  i will be spending some time today working out my christmas cookie list and preparing a grocery list to go with it.  i like the modeling chocolate so much i am thinking i might do my usual sugar cookies and do layers with modeling chocolate - all using my cricut cake machine.  what do y'all think?  in addition i usually make cranberry orange oatmeal cookies every year.  in addition i try to make 3-4 others kinds too.  YUMMY!

i was chatting with my buddy Suzanne last night and she had posted about her latest challenge on the Color Me Creative classroom site.  the challenge is for copics/promarkers only and i said "what about us pencil peeps?"  and she said "i guess you better put one together for the site."  so i am wondering if any pencil coloring devotees would be interested in joining a pencil only challenge.  for now we will follow the regular cmc challenge but if there is enough interest perhaps we will branch off on our own.  the current challenge is for non-traditional hair color and ends tomorrow so i colored something up real quick last night for it:

i think she turned out cute with her red & pink hair.  the image is from tiddly inks and i used a sketch from the december card sketches on page maps.

in addition to the cmc challenge i am entering this card in the follwoing other challenges:
the fabby glitter paper is from Best Creations - love that stuff!  i used some die cuts from the Father Christmas set at Lettering Delights with Glittered Skittles from Your Next Stamp as the berries.

and of course my image is colored with colored pencils - prismas this time with a blending pencil:


CMC is the Color Me Creative classroom site Suzanne started for her online Copic Classes and i teach Cricut and Prisma classes there as well.  if you want to improve your pencil coloring or expand your knowledge check out the classes - they are discounted until Jan 5th so now is a good time to enroll!  maybe a little christmas present to yourself.....i don't JUST teach you how to use the pencils but how to shade, skin tones, hair - lots of stuff!

if you want to submit a pencil (or copic of course) project for the CMC challenge just upload it to the site with the tag PUNK.

Monday, December 5, 2011

beaded christmas barrette

hi all!

well yesterday was the first day in 9 days i did not have a headache!  i actually played around in my craft room too for the first time in a week (last week's posts were pre-done) and recorded three new videos which i will be posting throughout the week.  have any of you been watching tim's 12 tags of christmas?  god i love that man - genius am i right???  i think the tags so far this year have been my fave ones since he started doing them.  i am hoping to feel well enough to participate in some of them.  are any of you doing them too?

i DID get a little crafty while i hung out on the couch - as y'all know i like to crochet and often crochet my own embellishments as well as hats and scarves and amigurami toys.  well check this out:

 
another long time love of mine is seed beads and i have always wanted a beaded bag - small like for debit card, license and cash.  before pezza came along i was working on way doing peyote stitch bead weaving - it is about half way done and then along came pez and millions of tiny seed beads just was NOT a good idea.  so i put it away and never picked it back up - i have since lost track of my beaded amulet books (which makes me very sad) and had given up.  then i came across this awhile back and ordered it:

Tapestry Bead Crochet


seed beads AND crochet! <3

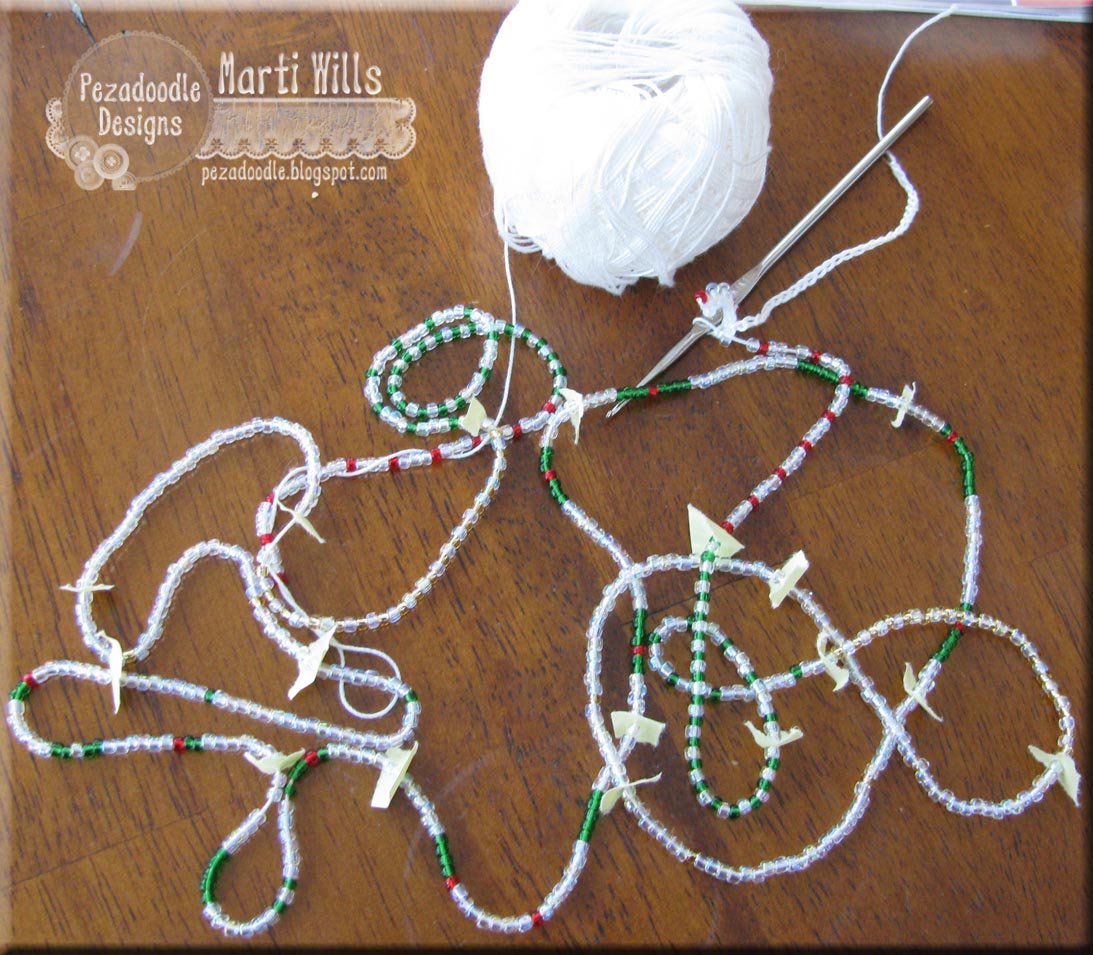
so i pulled it out and began looking through it and reading it and realized it is actually pretty darn EASY!  you start with a pattern much like a cross stitch diagram and then string your beads row by row on your thread:


now for anyone who wants to try this - some tips to save you from pulling your hair out - most important is the beads you use - the vials of beads you get at Michaels are NOT going to work for several reasons - they are not uniform in size and shape AND the hole will be too small in most of them to get a needle through - this goes for bead stitching too.  the BEST quality are Delica seed beads followed closely by Dyna-mites from Fire Mountain Gems (a much better price than Delicas) and Toho which are the only ones available at my local bead store and what i used for the green, red and gold here. however, i will take the time to order dyna-mites or delicas for future projects because they are a little better in size consistency.  the bits of paper on the string indicate where one row ends and another begins.
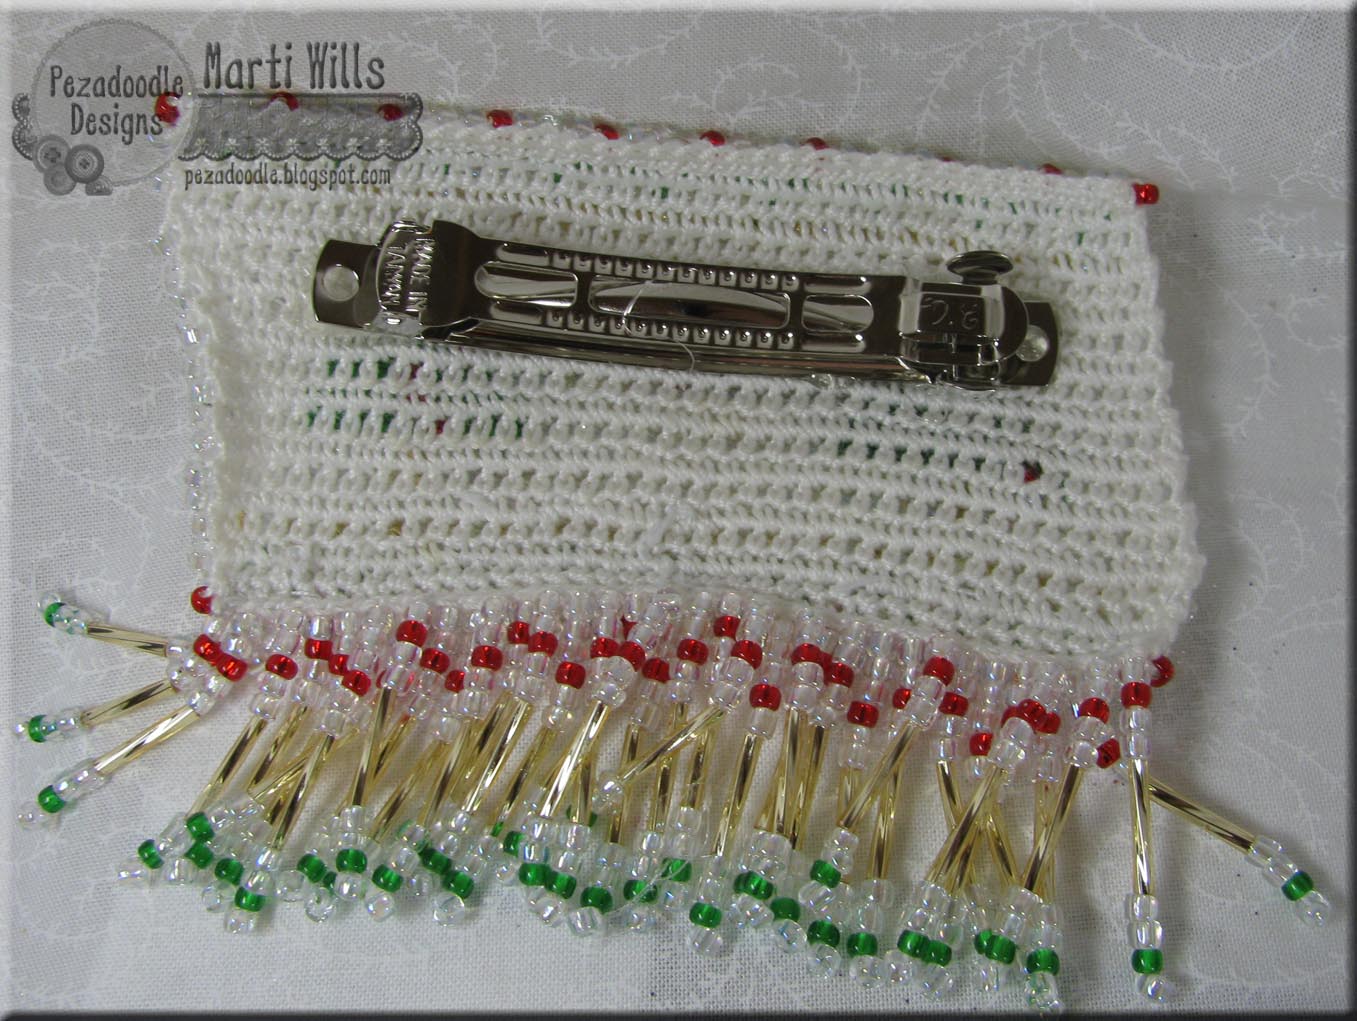
from there it is simple single crochet, adding a bead to each stitch and working every other row from the back when you turn so the beads are all on the same side.  here is the back of the piece (a barrette for pezza by the way)

no my rows aren't exactly even but it does not take away from the piece i don't think.  i did this as a sort of trial to see what it was like and i designed the pattern myself.

i am planning on making my little pouch soon - though it will be much bigger than this and take much longer.  i will not be using one of the patterns in the book - i found one on etsy in Out Of the Flames i loved and lori helped by customizing it for a pouch rather than a bracelet - she was super fast and very sweet!  i highly recommend her!  in addition i will be working on some of my own pattern designs for a spring bag as well as some beaded easter eggs for Through the Craft Room Door so be on the lookout for those if you subscribe (and if you don't WHAT ARE YOU WAITING FOR???)for anyone interested - here is the pattern:

i have some more barrette designs i am working on and will share those here! t his barrette was done using size 8 seed beads but i will be doing the pouches with the smaller size 11 beads.

what do you think of this new endeavor?