Hi all!
Well, Halloween is done so onward we go - and yes I am skipping Thanksgiving and going straight to Christmas! I don't really need any Thanksgiving stuff but I do need Christmas cards! I have 3 for this week's challenge on Bitten By the Bug 2 - holiday images from nature.
I LOVE Christmas stuff mostly because it's the only time of the year (except Mardi Gras of course) where the more sparkle you have the better! In light of that I began this set of cards by mixing up some super sparkly mist using Splash of Color Primary Elements powder, gum arabic and water. I misted lightly over a stencil - a combination of green and gold for 2 and blue and gold for the center one.
I wanted to keep these clean and simple so the only thing I added were Cricut cuts and a simple stamped sentiment. You can really see the sparkle!
I only used 2 of the layers for this snowflake - again to keep it simple.
I just love that shimmer!
Be sure to head over to the BBTB2 blog to check out the awesome projects from the other designers and then make something yourself to link to our challenge!
Showing posts with label primary elements. Show all posts
Monday, November 7, 2016
BBTB - Holiday Nature
Tags:
BBTB,
Cricut Explore,
primary elements
Monday, June 20, 2016
BBTB - Twins
Hi all!
Pezza and I are in for an extremely exciting week - we are making the long, nerve-wracking drive up north to see Drake (my oldest), Dianne (DIL) and finally meet my little grandbaby, Julian! He is 9 months old already! It is incredibly tough being so far away but I know they are happy living up there. Y'all will probably be seeing future scrapbook pages featuring this little guy!
This week's challenge on Bitten By the Bug is twins - you must include 2 of something in your project. How easy is that to come up with something? Pretty WIDE OPEN so come join us! I ended up not going with my original idea when I spied this cut while scrolling through for something else:
So cute and SO EASY - it is all one cut from the Picturesque cartridge. I decided to jazz it up a bit though by embellishing the 2 dragonflies. Here is how I made them so incredibly sparkly.
When you load the cut into Design Space you will have 2 items - the blue background and the green dragonfly cut out. I duplicated the dragonfly cut out so I had 2 of them.
Next I carefully snipped the 2 dragonflies off of the border by hand - quick and easy.
To make them so sparkly I first stamped the wings with my Versamark ink pad, then I used a dry brush to brush on Primary Elements Artist Pigment Powders. If you are not familiar with these you need to be! The colors are vibrant and beautiful. In addition, they have mica sparkle mixed in that is out of this world. I used several colors on the wings. I sprayed them with a product called Workable Fixative to make sure the powder did not rub back off. (You can also use hair spray.) Then I used Stickles (color is Patina) along the bodies. I ran the background through an embossing folder for added interest. Glue the dragonflies in place and add ribbon through the hole and you have a fantastic gift tag!
Be sure to stop by the Bitten By the Bug blog to see what the other design team members have created - they always amaze me! Then join the challenge and post YOUR design for us to see!
Pezza and I are in for an extremely exciting week - we are making the long, nerve-wracking drive up north to see Drake (my oldest), Dianne (DIL) and finally meet my little grandbaby, Julian! He is 9 months old already! It is incredibly tough being so far away but I know they are happy living up there. Y'all will probably be seeing future scrapbook pages featuring this little guy!
This week's challenge on Bitten By the Bug is twins - you must include 2 of something in your project. How easy is that to come up with something? Pretty WIDE OPEN so come join us! I ended up not going with my original idea when I spied this cut while scrolling through for something else:
So cute and SO EASY - it is all one cut from the Picturesque cartridge. I decided to jazz it up a bit though by embellishing the 2 dragonflies. Here is how I made them so incredibly sparkly.
When you load the cut into Design Space you will have 2 items - the blue background and the green dragonfly cut out. I duplicated the dragonfly cut out so I had 2 of them.
Next I carefully snipped the 2 dragonflies off of the border by hand - quick and easy.
To make them so sparkly I first stamped the wings with my Versamark ink pad, then I used a dry brush to brush on Primary Elements Artist Pigment Powders. If you are not familiar with these you need to be! The colors are vibrant and beautiful. In addition, they have mica sparkle mixed in that is out of this world. I used several colors on the wings. I sprayed them with a product called Workable Fixative to make sure the powder did not rub back off. (You can also use hair spray.) Then I used Stickles (color is Patina) along the bodies. I ran the background through an embossing folder for added interest. Glue the dragonflies in place and add ribbon through the hole and you have a fantastic gift tag!
Be sure to stop by the Bitten By the Bug blog to see what the other design team members have created - they always amaze me! Then join the challenge and post YOUR design for us to see!
Tags:
BBTB,
Cricut Explore,
primary elements,
tag
Sunday, May 24, 2015
Live Awake on the ColourArte blog
Hi all!
I have a piece on the ColourArte blog today! Live Awake - with a complete step by step tutorial! I would love if you stop by!
Tuesday, March 24, 2015
Caffeine!!!!
Hi all!
I bet some of you are feeling the first hints (or more) of Spring in the air! Pezza has been getting quite a bit of outdoor playtime which I am happy about. We have even fired up the grill a couple times.
My little grandson turned 3 months this weekend - I don't know if I posted it here or not but a few weeks ago his daddy (my son) took off for San Diego with Brennan and Jess quite suddenly. Just about broke my heart in a million pieces and Pezza and Kevin's too. We have slowly been adjusting to it but I sure don't like it one bit. So now both boys live far away :( Not ideal but they can't stay home forever I suppose.
I have been occupying myself with some studio time to take my mind off it and I am super pleased with the piece I have for you today! This has been rattling around in my head for several years now and to be honest, having the Cricut Explore to custom cut my chipboard pieces for it really got me itching to get it out of my head and onto a board! The huge mug and giant steam swirls are cut from an old cereal box using my Cricut Explore - amazing! I love it! This box was a little sturdier than the usual smaller boxes so I just had to choose the heavier cardstock setting when I cut it. Simple! Even the thin ends of the swirls! The whole piece measures 12" x 10" and is done on a piece of MDF.
It is near impossible to show you the full extent of the shimmer and dimension of this piece but I will try!
I have been doing mixed media pieces for several years now and I have tried to experiment and stretch myself quite a bit when working on my backgrounds but I was beginning to feel unhappy and frustrated with my work so I thought I would go back to the beginning and do it the way I did initially. I enjoyed it a lot more and am very pleased with the result.
Here is a close up of a portion of it - the background began with several rectangles of patterned paper from a very old paper pad I found in my stash. I used a sponge to dab on Buff Acrylic Paint and then went over it again with Nutmeg ColourArte Silks. Once dry I layered on several more colors of Silks - Carribean Mist, Moss Green and more Nutmeg as well as a darker brown Acrylic craft paint by dry brushing and using my fingers. You can also see the hints of purple in the upper right corner of the picture above - I sponged on a bit of Wisteria Silks through sequin waste. I had added it to the coffee mug and needed to also incorporate it into the background for cohesiveness. The parts of the background that look like they are glowing are a result of the magic that is Silks Acrylic Glazes!
I needed to add a hint of texture so I used a stencil and some of the amazing new Radiant Gel in Autumn Leaf. It is the same thing I used for the coffee in the mug. Just look at that crispness - never gets old! Not ever and now with the Radiant Gels it is so easy to achieve this look.
Here is a better look at the mug and the coffee. The little white foam swirl was one of the layers of this coffee cup and I embedded it right into the Radiant Gel while it was wet.
But let's talk about the MUG! This is probably one of my favorite techniques of all time and I just knew it would be perfect for a mug. It's a little messy but SO worth it!
You need to start with a fairly sturdy piece of chipboard for your base. Paint the chipboard with Silks- I used Carribean Mist - a medium to dark color works best. Next I coated it with Versamark and then several layers of UTEE - Ultra Thick Embossing Enamel, melting them each and adding more UTEE until I have a nice thick coat. Gather several colors of Primary Elements at the ready. Now smoosh it down really good into a Versamark pad so the surface is good and sticky. Take a small soft brush and dip it into the Primary Elements powder and brush it onto the sticky surface of your piece. Repeat this in a random way around the surface of your piece. DON'T cover the piece completely. It is ok if some of the colors mix and overlap. Once you are happy with the placement of the powders get some clear embossing powder and have it ready. Heat the piece up again until it is melty. Now quickly sprinkle the embossing powder into the powder areas and melt it. It will "fall through" the powder and create a sort of crackled webby look. Repeat this process until you are satisfied. The powders will sort of "float around" in the clear coating of UTEE. When hubby came in and saw it he said it looked like a real ceramic coffee mug!
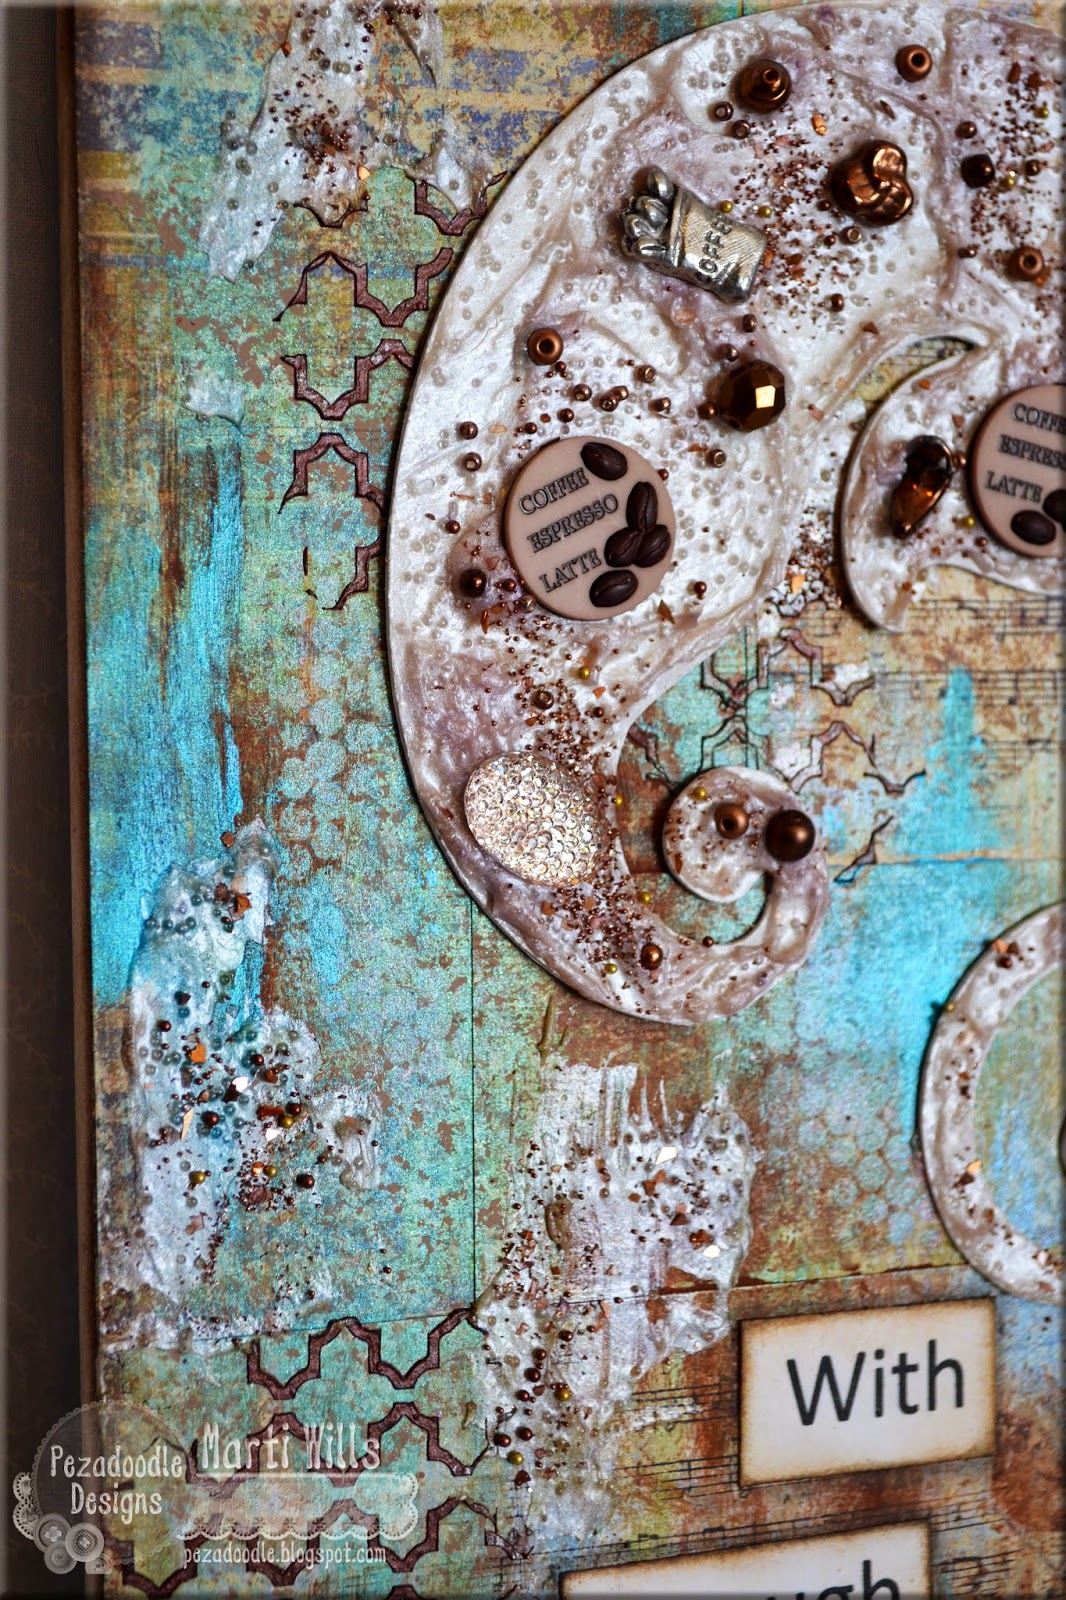
And now the swirls of steam! I mixed up a glorious batch of shimmering gel using regular gel medium, clear micro beads and Primary Elements powders in Oyster and a touch of Mocha Rose. I painted the swirls white and then piled on the shimmery gel. Then I embedded some coffee themed buttons and charms along with a few beads and a sprinkling of Gala Glitz which is a mixture of microbeads, shards of glass glitter and glitter. I added a bit of the mixture here and there to the background as well....
As for the saying, everyone who knows me knows I drink coffee ALL the time. Like all the time. I do believe "With enough caffeine...Anything is possible!"
I bet some of you are feeling the first hints (or more) of Spring in the air! Pezza has been getting quite a bit of outdoor playtime which I am happy about. We have even fired up the grill a couple times.
My little grandson turned 3 months this weekend - I don't know if I posted it here or not but a few weeks ago his daddy (my son) took off for San Diego with Brennan and Jess quite suddenly. Just about broke my heart in a million pieces and Pezza and Kevin's too. We have slowly been adjusting to it but I sure don't like it one bit. So now both boys live far away :( Not ideal but they can't stay home forever I suppose.
I have been occupying myself with some studio time to take my mind off it and I am super pleased with the piece I have for you today! This has been rattling around in my head for several years now and to be honest, having the Cricut Explore to custom cut my chipboard pieces for it really got me itching to get it out of my head and onto a board! The huge mug and giant steam swirls are cut from an old cereal box using my Cricut Explore - amazing! I love it! This box was a little sturdier than the usual smaller boxes so I just had to choose the heavier cardstock setting when I cut it. Simple! Even the thin ends of the swirls! The whole piece measures 12" x 10" and is done on a piece of MDF.
It is near impossible to show you the full extent of the shimmer and dimension of this piece but I will try!
I have been doing mixed media pieces for several years now and I have tried to experiment and stretch myself quite a bit when working on my backgrounds but I was beginning to feel unhappy and frustrated with my work so I thought I would go back to the beginning and do it the way I did initially. I enjoyed it a lot more and am very pleased with the result.
Here is a close up of a portion of it - the background began with several rectangles of patterned paper from a very old paper pad I found in my stash. I used a sponge to dab on Buff Acrylic Paint and then went over it again with Nutmeg ColourArte Silks. Once dry I layered on several more colors of Silks - Carribean Mist, Moss Green and more Nutmeg as well as a darker brown Acrylic craft paint by dry brushing and using my fingers. You can also see the hints of purple in the upper right corner of the picture above - I sponged on a bit of Wisteria Silks through sequin waste. I had added it to the coffee mug and needed to also incorporate it into the background for cohesiveness. The parts of the background that look like they are glowing are a result of the magic that is Silks Acrylic Glazes!
I needed to add a hint of texture so I used a stencil and some of the amazing new Radiant Gel in Autumn Leaf. It is the same thing I used for the coffee in the mug. Just look at that crispness - never gets old! Not ever and now with the Radiant Gels it is so easy to achieve this look.
Here is a better look at the mug and the coffee. The little white foam swirl was one of the layers of this coffee cup and I embedded it right into the Radiant Gel while it was wet.
But let's talk about the MUG! This is probably one of my favorite techniques of all time and I just knew it would be perfect for a mug. It's a little messy but SO worth it!
You need to start with a fairly sturdy piece of chipboard for your base. Paint the chipboard with Silks- I used Carribean Mist - a medium to dark color works best. Next I coated it with Versamark and then several layers of UTEE - Ultra Thick Embossing Enamel, melting them each and adding more UTEE until I have a nice thick coat. Gather several colors of Primary Elements at the ready. Now smoosh it down really good into a Versamark pad so the surface is good and sticky. Take a small soft brush and dip it into the Primary Elements powder and brush it onto the sticky surface of your piece. Repeat this in a random way around the surface of your piece. DON'T cover the piece completely. It is ok if some of the colors mix and overlap. Once you are happy with the placement of the powders get some clear embossing powder and have it ready. Heat the piece up again until it is melty. Now quickly sprinkle the embossing powder into the powder areas and melt it. It will "fall through" the powder and create a sort of crackled webby look. Repeat this process until you are satisfied. The powders will sort of "float around" in the clear coating of UTEE. When hubby came in and saw it he said it looked like a real ceramic coffee mug!
And now the swirls of steam! I mixed up a glorious batch of shimmering gel using regular gel medium, clear micro beads and Primary Elements powders in Oyster and a touch of Mocha Rose. I painted the swirls white and then piled on the shimmery gel. Then I embedded some coffee themed buttons and charms along with a few beads and a sprinkling of Gala Glitz which is a mixture of microbeads, shards of glass glitter and glitter. I added a bit of the mixture here and there to the background as well....
As for the saying, everyone who knows me knows I drink coffee ALL the time. Like all the time. I do believe "With enough caffeine...Anything is possible!"
Tuesday, January 27, 2015
Normalcy....NOT
Hi all!
I hope y'all have all fared ok in the northeast! I hear it was not quite as bad as initially thought. My son is in southern New Hampshire and still has power so I am happy about that! All we got was a dusting and 2 more days of school cancellation (for all that is good and merciful please don't let tomorrow be day 3). I started feeling a bit iffy last night and was petrified I had the flu that hubby had about a month ago but so far I am only mildly sick - because flu and school cancellation together would just be too evil!
I have an art journal page to share - I actually did it last Friday and was even going to have a video to go with it but I am stuck in an onslaught of technology hell at the moment that just won't let up! My video camera wouldn't stop shaking, then my camera battery died when I went to download the pictures, next my computer gave me the blue screen of death and a boot drive error so I was scrambling to figure out how I was going to back up all of my files since we have been a bit slack in that area. Hubby's computer backs up automatically but not mine. So I decided to go with Backblaze in case anyone is wondering - it can take up to 2 weeks to back up so I feel like I have a ticking time bomb. My computer has about 170 GIGS of files! When I bought my first computer it had 4 MG of memory and the salesman swore I could never fill it up in a lifetime! MY how things have changed!
Anywho, the mixed media challenge on SCS last Friday was to do something monochrome - this was one of those times when I had a GREAT idea in my head but it was tougher to translate it onto paper.
PERFECT saying for me!
Leslie over at ColourArte came out with several delectable new colors for the Primary Elements powders and I decided to go with Beachhouse Blue for my one color. I used it a couple of different ways to come up with my page - the BRILLIANCE of Primary Elements - the versatility is mind boggling!
The base is watercolor paper so I didn't get as much warping. I began by mixing pea sized amounts of Primary Elements and Gum Arabic into water in a mini mister and sprayed my paper. Once dry, I stamped using Gesso - I was really hoping the color of the mist would come up through the Gesso a bit but it did not. :( Next I mixed the Primary Elements into Glazing Medium and sponged it on through sequin waste for the darker circles you see..
Next I mixed it into Modeling Paste so I could get some dimension onto my page. I scraped this on through another stencil.
I had a piece of "throw away paper" from my first attempt at a page I decided to use it to cut some flower die cuts to use. I added a bit of extra stamping with a musical background stamp. I edged them with the same ink pad and then added a glittering center of Gala Glitz - This is amazing stuff from Art Institute Glitter - a mix of colored glass glitter chunks, shards and dust plus microbeads. The stems are Viva Decor Pearl Pen.
I rarely ever have so much white space on an art journal page! I like it! I also love all that delicious glimmer from the ColourArte Primary Elements!
I am submitting this for the following challenge:
I hope y'all have all fared ok in the northeast! I hear it was not quite as bad as initially thought. My son is in southern New Hampshire and still has power so I am happy about that! All we got was a dusting and 2 more days of school cancellation (for all that is good and merciful please don't let tomorrow be day 3). I started feeling a bit iffy last night and was petrified I had the flu that hubby had about a month ago but so far I am only mildly sick - because flu and school cancellation together would just be too evil!
I have an art journal page to share - I actually did it last Friday and was even going to have a video to go with it but I am stuck in an onslaught of technology hell at the moment that just won't let up! My video camera wouldn't stop shaking, then my camera battery died when I went to download the pictures, next my computer gave me the blue screen of death and a boot drive error so I was scrambling to figure out how I was going to back up all of my files since we have been a bit slack in that area. Hubby's computer backs up automatically but not mine. So I decided to go with Backblaze in case anyone is wondering - it can take up to 2 weeks to back up so I feel like I have a ticking time bomb. My computer has about 170 GIGS of files! When I bought my first computer it had 4 MG of memory and the salesman swore I could never fill it up in a lifetime! MY how things have changed!
Anywho, the mixed media challenge on SCS last Friday was to do something monochrome - this was one of those times when I had a GREAT idea in my head but it was tougher to translate it onto paper.
PERFECT saying for me!
Leslie over at ColourArte came out with several delectable new colors for the Primary Elements powders and I decided to go with Beachhouse Blue for my one color. I used it a couple of different ways to come up with my page - the BRILLIANCE of Primary Elements - the versatility is mind boggling!
The base is watercolor paper so I didn't get as much warping. I began by mixing pea sized amounts of Primary Elements and Gum Arabic into water in a mini mister and sprayed my paper. Once dry, I stamped using Gesso - I was really hoping the color of the mist would come up through the Gesso a bit but it did not. :( Next I mixed the Primary Elements into Glazing Medium and sponged it on through sequin waste for the darker circles you see..
Next I mixed it into Modeling Paste so I could get some dimension onto my page. I scraped this on through another stencil.
I had a piece of "throw away paper" from my first attempt at a page I decided to use it to cut some flower die cuts to use. I added a bit of extra stamping with a musical background stamp. I edged them with the same ink pad and then added a glittering center of Gala Glitz - This is amazing stuff from Art Institute Glitter - a mix of colored glass glitter chunks, shards and dust plus microbeads. The stems are Viva Decor Pearl Pen.
I rarely ever have so much white space on an art journal page! I like it! I also love all that delicious glimmer from the ColourArte Primary Elements!
I am submitting this for the following challenge:
- Stamping Sensations - Dies & Punches
Wednesday, December 17, 2014
Tutorial Time! Misty tags.
Hi all!
Well, we still have no baby. My poor son and his girlfriend. They have been sent home 3 times from the hospital in the last week. Poor thing, Jess thinks she is feeling bad now and having contractions and discomfort but I think she doesn't realize just how bad it's going to get! Those babies just take their time sometimes!
Meanwhile, in crazy Christmas-ing....
Anyone else still wrapping gifts??? I have a way to go but at least they are mostly purchased at this point. AND I have the ones I need to ship all boxed up and ready to go so that's good. I thought I would give you another tutorial for tags today in case you need a few more!
Aren't they pretty?! These are easy to do using my MOST favorite Shimmering product on the market - Primary Elements Artist Pigment Powders. Why are these my favorite? Several reasons - The colors are brilliant and beautiful. The shimmer is fantastic. And most importantly, the immense versatility. These powders are the base for ALL shimmering types of mediums and if you are like me when you want something you want one of EVERY color! But the cost and storage can make that difficult so with Primary Elements powders I have gorgeous shimmering mists, paints, gels, anything I want. It just depends on what I add the powders to. This tutorial will show you just 2 of the MANY ways you can use these!
First, lets make a shimmering mist. To do this you will need a mister of water, Gum Arabic - powder or liquid works, Primary Elements powder and a little scoop of some sort. Gum arabic can be purchased in the art supply section of a craft store or online at Dick Blick and other places.
Add equal amounts of Gum Arabic and Primary Elements to the mister of water. You can see above about how much to add.
Now mist your tags. There are 2 ways you can do this. On the left I sprayed the mist on to my craft sheet and laid the tag down in the puddle, lifted it, turned it, laid it down again and repeated this until I was happy with the color. For this red tag I used Poppy Red, a great color at Christmas because the shimmer is gold - I love red and gold at Christmas! For the tag on the right I just misted generously directly on to the tag. This gives a more even coverage of both the red color and the gold shimmer.
Want to step it up a notch? Grab a stencil. I placed the stencil over the tag on the right and misted - do this lightly and at a bit of a distance so it is crisp. Then I lifted the stencil and immediately laid it face down onto the tag on the left for a reverse, looser version. This color is a newer one called Vintage Mint - just gorgeous!
Now grab a second stencil, something with a bit smaller design and we are going to do a tone on tone effect using the same color Primary Elements and Gel Medium.
Put some Gel Medium on a craft mat and then scoop out some Primary Elements and mix them together really well. Place your stencil over your tag and smooth the colored Gel Medium like you would icing on a cake. The less you mess with it the less likely it is to smear underneath.
Finish them off with ribbons, die cuts, a sentiment or however you like!
The Gel Medium gives it a neat, subtle dimension that really adds to the effect.
These are such a pretty addition to your holiday packages.
I truly love my collection of Primary Elements and consider them some of my most worthy expenditures in my studio and I bet you will love them too! Check out the full range of gorgeous colors at ColourArte!
************************************************
I am entering these tags in the following challenges:
Well, we still have no baby. My poor son and his girlfriend. They have been sent home 3 times from the hospital in the last week. Poor thing, Jess thinks she is feeling bad now and having contractions and discomfort but I think she doesn't realize just how bad it's going to get! Those babies just take their time sometimes!
Meanwhile, in crazy Christmas-ing....
Aren't they pretty?! These are easy to do using my MOST favorite Shimmering product on the market - Primary Elements Artist Pigment Powders. Why are these my favorite? Several reasons - The colors are brilliant and beautiful. The shimmer is fantastic. And most importantly, the immense versatility. These powders are the base for ALL shimmering types of mediums and if you are like me when you want something you want one of EVERY color! But the cost and storage can make that difficult so with Primary Elements powders I have gorgeous shimmering mists, paints, gels, anything I want. It just depends on what I add the powders to. This tutorial will show you just 2 of the MANY ways you can use these!
First, lets make a shimmering mist. To do this you will need a mister of water, Gum Arabic - powder or liquid works, Primary Elements powder and a little scoop of some sort. Gum arabic can be purchased in the art supply section of a craft store or online at Dick Blick and other places.
Add equal amounts of Gum Arabic and Primary Elements to the mister of water. You can see above about how much to add.
Now mist your tags. There are 2 ways you can do this. On the left I sprayed the mist on to my craft sheet and laid the tag down in the puddle, lifted it, turned it, laid it down again and repeated this until I was happy with the color. For this red tag I used Poppy Red, a great color at Christmas because the shimmer is gold - I love red and gold at Christmas! For the tag on the right I just misted generously directly on to the tag. This gives a more even coverage of both the red color and the gold shimmer.
Want to step it up a notch? Grab a stencil. I placed the stencil over the tag on the right and misted - do this lightly and at a bit of a distance so it is crisp. Then I lifted the stencil and immediately laid it face down onto the tag on the left for a reverse, looser version. This color is a newer one called Vintage Mint - just gorgeous!
Now grab a second stencil, something with a bit smaller design and we are going to do a tone on tone effect using the same color Primary Elements and Gel Medium.
Put some Gel Medium on a craft mat and then scoop out some Primary Elements and mix them together really well. Place your stencil over your tag and smooth the colored Gel Medium like you would icing on a cake. The less you mess with it the less likely it is to smear underneath.
Finish them off with ribbons, die cuts, a sentiment or however you like!
The Gel Medium gives it a neat, subtle dimension that really adds to the effect.
These are such a pretty addition to your holiday packages.
I truly love my collection of Primary Elements and consider them some of my most worthy expenditures in my studio and I bet you will love them too! Check out the full range of gorgeous colors at ColourArte!
************************************************
I am entering these tags in the following challenges:
- Fussy & Fancy - Snowflakes & Ribbon
- Crafty Creations - Something to Die For
- Clear It Out - Anything Goes
- Papertake Weekly - Anything Goes Festive
- Loves Rubber Stamps - Holiday Blitz Anything Goes
- Card Mania - Christmas
- Crafty Cardmakers - Christmas
Tags:
ColourArte,
mixed media,
primary elements
Friday, August 8, 2014
Keeping it Clean & Simple
Hi all!
A new card for today - and a new genre for me - Clean & Simple style. I did it for the CAS challenge on Splitcoast Stampers - we were to case a card from the featured stampers gallery. I am also submitting this to the following challenges:
I began by masking off a diagonal strip on the white card front using post it notes. Then I laid a stencil over it and sponged on Moss Green ColourArte Silks Acrylic Glaze - love that shimmer! I accented the diagonal stenciling with 2 lines of embossing on either side using my Scor-Pal.
I finished it up with a layered embellishment - I cut felt with a Spellbinders die and then added a flower I made using clay and a silicone mold from Etsy. Before baking it I lightly brushed it with ColourArte Primary Elements shimmering powder. I stamped a Studio G $1 sentiment and added purple sparkly Pez-A-Bling on each side.
Thanks for stopping by!
- Gem of a challenge - Embossing
- Sisterhood of the Snarky Stampers - 1 Layer
I began by masking off a diagonal strip on the white card front using post it notes. Then I laid a stencil over it and sponged on Moss Green ColourArte Silks Acrylic Glaze - love that shimmer! I accented the diagonal stenciling with 2 lines of embossing on either side using my Scor-Pal.
Thanks for stopping by!
Wednesday, August 6, 2014
Mixin' It Up
Hi all!
Combining my card making with my love of all things mixed media today with this card. I was inspired by several challenges:
This card was so much fun! When I first saw the color challenge on Splitcoast and pulled out the 4 papers I was not too sure I could pull it off but as I was working I liked it so much I made TWO! This is the first one.
Rather than use patterned paper I took a paper with a faint script running across it and gave it some mixed media flair. I began by making a yellow paint with Primary Elements powder and Glazing Medium and sponged it on through sequin waste. Next I mixed the same paint in a red color and applied it using the side of small gift card. I finished off by mixing a pale blue color into molding paste and applied it through a stencil.
On the stamped image I mixed the same blue Primary Elements with gum arabic and water and spattered it on the image. Then I mixed the same yellow color into the molding paste and applied it through the same stencil. I added more of the red lines to tie it all together. It's done on Cryogen White paper from the Paper Temptress - I love how it sparkles! I finished it off with 3 little pale blue Pez-A-Bling squares in the upper left corner.
So what do you think?
Combining my card making with my love of all things mixed media today with this card. I was inspired by several challenges:
- SCS - Color Challenge 490
- Lunchtime Sketch
- Crafting When We Can - Bright Colors
- Mixed Media Card Challenge - Summer
- Tok Bobok - Mixed Media
This card was so much fun! When I first saw the color challenge on Splitcoast and pulled out the 4 papers I was not too sure I could pull it off but as I was working I liked it so much I made TWO! This is the first one.
Rather than use patterned paper I took a paper with a faint script running across it and gave it some mixed media flair. I began by making a yellow paint with Primary Elements powder and Glazing Medium and sponged it on through sequin waste. Next I mixed the same paint in a red color and applied it using the side of small gift card. I finished off by mixing a pale blue color into molding paste and applied it through a stencil.
On the stamped image I mixed the same blue Primary Elements with gum arabic and water and spattered it on the image. Then I mixed the same yellow color into the molding paste and applied it through the same stencil. I added more of the red lines to tie it all together. It's done on Cryogen White paper from the Paper Temptress - I love how it sparkles! I finished it off with 3 little pale blue Pez-A-Bling squares in the upper left corner.
So what do you think?
Tuesday, July 15, 2014
A new story
Hi all!
I have been taking a class from the very talented Kate Crane called Journal Soup and having a lot of fun with it. It has forced me to go outside of my comfort zone and boy do I resist that but I am quite pleased with the results. Here is my fourth page:
Of course I couldn't resist making up my own shimmering color mists with my hands down favorite product - Primary Elements by CoulourArte.
When I tilt it in the light it just glows! NEVER gets old!
I collected a fantastic list of things to do for yourself that was posted somewhere around New Year's - I wish I had kept track of the link. I have been making journal pages with them so I can think about them and try to keep them in mind - life sure can be a struggle sometimes! I don't think I have posted all of the pages here, maybe I will. Not sure anyone would see them so I have been posting them on Facebook and leaving it at that...
I have been taking a class from the very talented Kate Crane called Journal Soup and having a lot of fun with it. It has forced me to go outside of my comfort zone and boy do I resist that but I am quite pleased with the results. Here is my fourth page:
Of course I couldn't resist making up my own shimmering color mists with my hands down favorite product - Primary Elements by CoulourArte.
When I tilt it in the light it just glows! NEVER gets old!
I collected a fantastic list of things to do for yourself that was posted somewhere around New Year's - I wish I had kept track of the link. I have been making journal pages with them so I can think about them and try to keep them in mind - life sure can be a struggle sometimes! I don't think I have posted all of the pages here, maybe I will. Not sure anyone would see them so I have been posting them on Facebook and leaving it at that...
Tags:
art journal,
mixed media,
primary elements
Wednesday, January 8, 2014
Journal 52 day - week 1
Hi all!
I came across a journaling prompt Facebook group called Journal 52 starting up for the new year and thought I would join in the fun. There is a new prompt each week - this week the prompt is "Up, up and away." Pezza decided to join in on this one too (being as how we were having the Xmas break that never ends - thanks a lot Polar Vortex :P)
In addition to the Journal 52 challenge we decided to use something else I made up to help - I made a bunch of product/technique prompts and we turned them all over and drew some to help our work along.
I suggested we draw 6 but Pezza insisted on drawing more. Here are hers:
She actually had 9 but it got to a point where I was like ok we can only do so much at once.....
She did such a great job! I try my best to give her as much freedom as I can - offering product usage info and suggestions but I let her make some choices too.
Her background has some subtle shimmer and I love the doodling she did with the gel pens! She is getting better at stenciling with pastes too.
And here is mine:
I left a few of the tags out! Six was more than enough!
I was inspired by the sunrise at the bus stop this morning - brilliant pinks, oranges and yellows masked by the cool soft tones of blueish purple clouds.....
"One can never consent to creep when one feels an impulse to soar." ~Helen Keller
I came across a journaling prompt Facebook group called Journal 52 starting up for the new year and thought I would join in the fun. There is a new prompt each week - this week the prompt is "Up, up and away." Pezza decided to join in on this one too (being as how we were having the Xmas break that never ends - thanks a lot Polar Vortex :P)
In addition to the Journal 52 challenge we decided to use something else I made up to help - I made a bunch of product/technique prompts and we turned them all over and drew some to help our work along.
I suggested we draw 6 but Pezza insisted on drawing more. Here are hers:
She actually had 9 but it got to a point where I was like ok we can only do so much at once.....
She did such a great job! I try my best to give her as much freedom as I can - offering product usage info and suggestions but I let her make some choices too.
Her background has some subtle shimmer and I love the doodling she did with the gel pens! She is getting better at stenciling with pastes too.
And here is mine:
I left a few of the tags out! Six was more than enough!
I was inspired by the sunrise at the bus stop this morning - brilliant pinks, oranges and yellows masked by the cool soft tones of blueish purple clouds.....
"One can never consent to creep when one feels an impulse to soar." ~Helen Keller
Tags:
art journal,
luminarte,
mixed media,
primary elements
Subscribe to:
Posts (Atom)