Showing posts with label cricut. Show all posts

Thursday, February 5, 2015

Cricut Explore is here!

Hi all!

My Explore is here!!!!!!!!!  It came late yesterday and I have had NO time to even open the box!  And I don't know if I can get to it today either!!!!  GAH!  I am a little afraid of it to honestly.  This is the first machine that has arrived without me having spent extensive time with the Provocraft crew learning all about it so I am on my own!

Today when I get back from taking care of the cats at the Petsmart adoption center I have a technician coming from Comcast to see WHY my download speed is so very extensively sucky here.  We spent most of the day troubleshooting Tuesday.  First I was on the phone with a technician who spent half the time picking up on me which was super creepy.  Then I wanted to upgrade to the faster speed service and had to call a different department and spoke to a woman who I am not sure had ever actually heard of the internet before.  She quoted me 3 different prices for the faster service NONE of which it turned out were correct, had no idea what a modem was when I kept asking her if there was an upgraded modem I could switch to.  So I finally gave up on that part.  Then when I said I wasn't sure I wanted to upgrade because I wasn't sure of the cost she told me she had already upgraded me without me agreeing to it.  WTF?!?!?  So I called back and requested a technician and he is NOT leaving this house until I have decent speeds!  Let's hope it's NOT the same technician who was picking up on me on the phone (though I am pretty sure the call was taken in India...)

Anywho - some scrappin' happened here yesterday:

Here is my latest layout - foster kittens!  We have had some 3 dozen foster kittens through here but some stay longer than others and this group was with us quite awhile!  They came to me with alot of health problems and we nursed them back to normal.


I have SUCH a hard time narrowing down my photos - I always want to use ALL of them and with a digital camera I take so many that it's just ridiculous!  I really liked this layout sketch from basic grey because it had alot of photos.  I did cut some of the photo spots in half to fit even more!


I used a cute little Cricut die cut for the blank spot on the right hand page - it is from Kate's ABCs - one of my FAVORITE cartridges - SO SO many cute images!


Ok off to do some chores!

Wednesday, January 14, 2015

A birthday x 2!

Hi all!

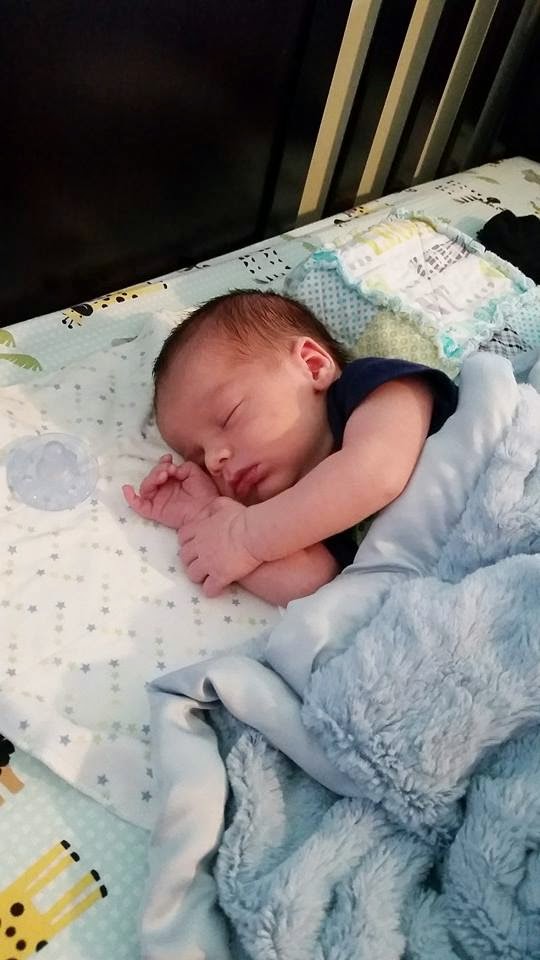
SO it occurred to me - I HAVEN'T SHOWN YOU MY NEW GRANDBABY!  That's right I am a grandma!  Meet little Brennen!


This is my baby boy with his baby boy!  I did not cry when I saw the Brennen but I DID cry when I saw Trevor with him.  It is so amazing...


Ahhh Mi Nieto (my grandson).  He is a good baby - running the new parents ragged of course but that's his job right?


And now I DO have a project for you today!  I got another gift card holder done.  This one is for a boy.


It was quick, easy and fun to put together - oh how I love my Cricut!  Once again the light green tab slides out and the gift card is attached to that insert.  The cut for this is on the Fabulous Finds cartridge - one of the first cartridges I believe.


The party hat is from the Sweet Treats cartridge.  I glued the shadow layer flush on the front of the card and then popped the hat itself up with foam tape.

I was inspired by the following challenges:


Friday, January 9, 2015

Eat Cake

Hi all!

Ahhh more snow days!  The Washington DC Metro area just can't handle the slightest bit of snowfall.  So we have had a couple days off.  Pezza has enjoyed some extra lazing around the house with her extended Winter break.

While she was off at a playdate I enjoyed some studio time.  I made myself a King Cake Latte, turned on some Downton Abbey and set to work!

I am always getting caught unprepared when Pezza gets invited to birthdya parties so I got several gift cards to keep on hand and wanted to make some gift card holders.  You may remember the ones I made for Christmas.  It is one of my all time favorite Cricut cuts - you can find it on the Fabulous Finds cartridge.  I chose to leave the gift card attached to its little sleeve and made the holder larger than usual which gave me more space to work with so I cut it at 6".


The sketch AND the color scheme are both challenges on SCS (Splitcoast Stampers) this week.  Eyelets were also on SCS (see my layout yesterday) and since they were still on my desk and turned out so nicely I decided to use them again!

My stamped image is from an old set exclusive to the store I used to have - Chocolate Treats 1 by Polkadot Pie.  I am pretty sure I still have a set or two left if you would like to get one!  Just let me know.  I colored it with Lyra Polycolor colored pencils.  Sentiment is Studio G as always!


I also couldn't wait to try out my newest toy - I have bought very little in the last few years but I really wanted one of the cool Spellbinders borders I came across so of course I contacted my buddy Terri at Stampsalive and she hooked me up!  She has really good prices!


This is what it looks like when you pull out the gift card insert - cool right?

I am including this project in the following challenges:


Saturday, December 13, 2014

Tutorial Time! Shimmering Snowflake Tags

Hi all!

Pezza is in gymnastics twice a week, there is a small waiting area lined with chairs for parents & siblings.  I am sitting there and there is another mom whose daughter is in Pezza's class who sits down with her older son.  She proceeds to have him take off his shoes and socks and begins checking him while telling him she is checking him for hand foot & mouth disease because his cousins have it and she is sure he does too. WTF!!!???!!  So as soon as class is over and we are in the car I tell Pez she needs to take a shower immediately.  She wants to know how the disease could be spread and I explain it is transmitted through body fluid so if the girl laughed and got spit on the mat and Pez put her hand in it and touched her eye it could be transmitted.  She was quiet for a few minutes and then I hear eveil laughter and she says Well!  One good thing that would come of getting the disease.  I could just walk up and cough on my enemies and BOOM they're out of school!  UMMMMM....seriously?  We went straight to bio-terrorism?  At the age of 8?  Scary girl this one.....

Anyway, I am back with another tutorial for you today!  They were inspired by the following challenges:


Aren't these tags pretty?  Well they're quick & easy too!


You just need a few items - your tags, 2 stamps (need to be red rubber - clear won't work), Twinkling H2Os, Silks Acrylic Glaze, paint brush and die cuts.  It is helpful to pick out the Twink color first and add a bit of clean water to begin softening the paint.


We are going to begin by stamping with the larger stamp using the Twinks.  Notice how thick the paint is in the picture above.  You want it nice and thick BUT don't load that much paint on the brush when you paint it onto the stamp.  You want to brush the Twinks onto the stamp thinly - try to avoid pooling the paint.  You almost won't be able to see the paint.  Work quickly but you don't need to feel panicky!  After you brush on the Twinks hold the stamp at a distance and mist lightly, then stamp onto your paper.

This technique can be tricky - some stamps work better than others.  I suggest testing it out on a scrap paper first.  Also you can "ghost stamp - if you mist the stamp again you can stamp it again and get a slightly different effect.


Next we are going to use the second stamp with the Silks.  Stamping with Silks is a bit different.


 Spread a small amount of Silks onto a non-stick surface in a thin layer.  Dab your stamp into the paint a few times and stamp onto your paper.


Add a few die cuts or embellishments to finish off the piece.  I love the way the 2 different paints shimmer in different ways - this adds interest to the overall piece.

Grab a set of each and start playing!  The best part?  You can stock up on Twinks RIGHT NOW for 25% off in this weekends flash sale!  This means the Twinks are only $3.23 each!!!  Grab a bunch on ColourArte while you can - the flash sale ends tomorrow!

Thursday, December 11, 2014

Twinkling Cards

Hi all!

Today I have a set of cards for you.  Did you see my tutorial on Twinkling H2O washes yesterday?  Check it out - Twinks.

I was inspired by the following challenges:


I love this technique.  It looks awesome and is so quick, easy and foolproof.


The die cuts were done on my Cricut.


This color Twink is called Beachhouse Blue and you can get it in the Nantucket Mist 6 piece mini collection on Amazon!


Look at that shimmer!  Have you used Twinks lately?  Leave me a link to your last Twinks project so I can check it out!

Wednesday, December 10, 2014

Twinkling Tag Tutorial

Hi all!

We are currently hiding from the flu over here.  Kevin has been down for 3 days now and sick as a dog!  He has been banned from the rest of the house and is stuck upstairs in our bedroom and his office.  Jessica is due to have her baby Christmas Eve so she could have it any day now and I really don't want her to have flu too!  NOT good for the baby.  So when he goes in the bedroom I Lysol the hell out of the office and when he is in the office I Lysol the bedroom.  He started Tamiflu yesterday so hopefully the rest of us will escape unscathed....

Despite the constant Lysoling I HAVE had some time to play my studio and I have a little tutorial for you using Twinkling H2Os!  It WAS going to be a video tutorial but I lost the cord that connects to my laptop so that was out!


These tags are also for the following challenges:


Now let me show you how easy it is to add some sparkle to your projects!


You'll need to gather a few things - this technique is done using gorgeous shimmering Twinkling H2Os - ever heard of them?  Gorgeous pots of hard cake watercolor paint with LOADS of shimmer and beautiful color.  Start by adding some water to the Twinks you will be using - I use a syringe or dropper and just make a bit of a puddle and then let it sit while you gather other things.

This will work best on watercolor paper - mine is cold press so it has some texture which I like.  Cut it to the final size you want to use on your tag or card.  You will also need a focal piece - die cuts work nicely, 1-2 background stamps and a soft neutral color like the Sahara Sand VersaMagic Dew Drop from Tsukineko I used here.  You will also need a paintbrush and fresh clear water.


We are going to begin our background with the Twinks.  The puddle of water should have softened the paint into a nice goopey puddle sort of the consistency of honey or slightly thinner.  If it is super thick add a bit more water.  Before you add paint to your paper use your brush and wet the paper with clear water.  Then add Twinks, a little at a time, in a loose stroke-y fashion where you wet the paper beforehand.  Some areas will be darker with more paint and others will be lighter and more watery.  Play with the amount of paint and water until you are happy with the look.  Use both paint and water sparingly, if you get too much blot with a paper towel.  At this point you can also mist the paper with water and the Twinks will fade even more around the edges for a watery loose look.  The shimmer will be more noticeable where the paint is thicker.  Let dry or use a heat gun.


Now take the ink pad (this is why I really LOVE dew drops) ink up your background stamp (the music in my example) in spots, not completely and stamp it on to your DRY paper.  If you have a second stamp (the pine tree flourish) ink it up and stamp it too.

 And that's all there is to it!  Simply add your focal piece/embellishment/die cut and you're done!  Below is another one I made using ornaments and one in blue using snowflakes.


The camera doesn't quite catch the immense sparkle but you can catch it a little bit.


I love my Twinks!  Do you have some you need to pull back out and put to use?  If not then I highly recommend them!  You can get them on Amazon!  If you try this technique out do come let me know - I would love to visit your blog and see it.  Tune in tomorrow - I will be posting some cards using this same technique!

Wednesday, September 3, 2014

Birthday Knight

Hi all!

Well what a crazy last couple weeks!  We have had my mom in town, driven up to New Hampshire to see Drake, Found out we are having a second grandchild in Spring and Pezza started SECOND GRADE!  Now I can have a bit of time to myself and see if I can't get my house back in order from the summer and spend some time crafting, sewing and doing some artwork!

Pezza's friend Jake, across the street, had a Knights themed birthday party and I needed a Bday tag as I am all out so I immediately thought of the Paper Dolls cartridge.  I can still remember the thrill of purchasing that particular cartridge.  I had not had my Cricut very long and I only had 2 cartridges.  The Paper Doll cartridge was an AC Moore exclusive and came as 1 of 4 in a bundle.  And those were the days when you had to pay full price for carts so that 4 pack cost a bundle!  Those were also the days when my entire paper crafting shenanigans fit on a card table and small plastic bin underneath it.  MY how things have exploded, but I digress.  I scrimped, I saved, I dreamed and then I splurged!  O. M. G. my husband is going to KILL me is all I thought so I had it stashed away!  Those were also the days of the Cricut Message board being insanely active and the best place ever to be on the web.  I love the friends I made there and still talk to some of them today!


It's a pretty simple tag as I was in a rush - I am the queen of never-plan-ahead but isn't he just so cute?!?!


I used some silver shimmery paper for his armor and gave his sword a blue pearl handle with some Liquid Pearls.  Of COURSE the sentiment is a $1 Studio G Stamp - also a throw back to those early days when I first started paper crafting and the product that started it all when I had the online store.  I still have sets I need to sell :P  Maybe this will be the year I can get some of my old inventory posted on the FB garage sale sites.

I am thinking I may have to challenge myself to do a slew of tags the way I did those cards for my mom (which she loved BTW.)  I did have fun with them....

And here is Pezza on her first day of second grade yesterday - MY she is getting big!  She was a baby when I got my Cricut!


Saturday, September 21, 2013

Party time!

Hi all!

Hooray for weekends right?  So last week I had put a post up on Facebook lamenting how every day I say "Tomorrow is sewing day.  I am going to sit and sew."  I have a backlog of sewing projects I really want to accomplish -  TWO quilts, a wall hanging, a purse my step mom has requested, fall/Halloween table linens, American girl doll clothes - the list goes on and on.  So in the comments my (awesome) neighbor says "You jut have to drop Pez at the bus stop and go in and do it."  My cousin says "What's stopping you!"  So I think "That's it!  Tomorrow I'm doin' it."  So what's stopping me?  I will do laundry while I sew so that I am still accomplishing something and just DO IT.  Here is how the day went
  • Begin cutting out purse pattern
  • Go to put my laundry in the dryer, hmmmm the load that's in there is not dry....I could have sworn I started the dryer twice already....I start it again.
  • Discover I am out of interfacing - now I will need to drive out to Leesburg to get some (we live in a small rural town.)
  • Go back to put the next load of laundry in the dryer....CLOTHES ARE STILL WET!!!  Now i KNOW i have turned it on...Holler for hubby who is working from home.
  • Begin dryer assessment.  No heat.  Commence dryer dismantling...which then involves dryer insides cleaning


Disgusting!
  • We will need a new heating element.  So that means calling around to find it.  Good news, found it.  Bad news, now I am not only driving to Leesburg for interfacing but also ALL the way to Sterling for the element - about 45 minutes away.
  • While I am in Sterling I think Hey, I can stop by that nursery I really love and check for the Sempervivum Pezza has been begging me for.
  • Plant lady is apparently lonely since the Spring rush and decides to educate me on EVERYthing you could EVER want to know about succulents.  Interesting but I AM TRYING TO SPEND THE DAY SEWING.
  • Hubby and I were going to do lunch but now I am running late and he got a meeting put on his schedule - how about I hit the drive thru on the way home.
  •  I roll up to the drive thru at 12:32 along with every other human for MILES around.
  • I get home, eat my lunch, I have about 1 hour left before Pezza gets home, phone rings.  It's my good friend Amy (Pickled Paper) whom I haven't talked to in ages and SO miss her!  We talk and talk and then it's time to go meet the bus.
And this is how my EVERY day seems to play out UGH!  Though my day interrupting event yesterday involved picking up two itty bitty kittens to spend a couple days with me to recover from surgery before heading to the adoption center at Petsmart.


As I was squealing over them in the back room at the vets office I said "You would think after having rescued DOZENS of babies I wouldn't swoon over babies anymore but it just never gets old and the vet (BEST VET EVER) says "Nope, it NEVER gets old!"  These two are probably some of the best kittens I have had come through here.

But to be fair I do squeeze a bit of playtime in here and there and today I have a quick and easy birthday tag to share.


When I was cutting the circle elements for the layout I posted yesterday I thought HEY that would be a great birthday tag!  A Studio G $1 stamp is perfect in the center!  (If you missed that craze I do still have a few of the spring sets available.)

Once again I used foam tape to pop a couple of the layers up for added dimension.  I really think it's key to how nice the finished tag looks.

And now we are off to the party!


I am enetering this in the following challenges:

Friday, September 20, 2013

Going In Circles with Cut It Up!

Hi all!

This is Graham

He is a foster cat staying with us and he is a mess....

Graham says love me pet me love me pet me love me pet me love me pet me ALL DAY LONG!  He needs a home with an old woman who sits and watches TV all day and wants a cat to sit on her lap for petting.....ALL DAY....Hahahhaha!

So today is kicking off another great Cut It Up challenge!

This time we are "Going in Circles." You must use circles on your project in addition to a die cut!  


I LOVE the picture on the left - the look on Pezza's face is perfect!  I used an old sketch from Basic Grey I found online as my kick off point:


I didn't follow it exactly but without sketches I would be lost!


This Itty Bitty stamp by Unity was perfect for this summertime layout!  I colored it up using colored pencils - I love adding flavored syrups to my lemonade so that is the way I colored it.


To give it a touch of realism I coated the jar portion with Glossy Accents - Love that stuff!

For my circle elements I used a cut from the Lacy Labels Cricut Cartridge - I cut one at 3.5" and one at 4.5".  I added some bits of Waterfall Stickles to give it a little bling!

We have two wonderful sponsors for the challenge - you could win 5 Itty Bittys from Unity StampCompany as well as a $20.00 Coupon from As Cute as a Button!


Come join in on the challenge and see what the rest of the DT girls came up with at Cut It Up!

In addition to the Cut It Up challenge I was also inspired by the following challenges for this layout: