Hi all!
I came across a journaling prompt Facebook group called Journal 52 starting up for the new year and thought I would join in the fun. There is a new prompt each week - this week the prompt is "Up, up and away." Pezza decided to join in on this one too (being as how we were having the Xmas break that never ends - thanks a lot Polar Vortex :P)
In addition to the Journal 52 challenge we decided to use something else I made up to help - I made a bunch of product/technique prompts and we turned them all over and drew some to help our work along.
I suggested we draw 6 but Pezza insisted on drawing more. Here are hers:
She actually had 9 but it got to a point where I was like ok we can only do so much at once.....
She did such a great job! I try my best to give her as much freedom as I can - offering product usage info and suggestions but I let her make some choices too.
Her background has some subtle shimmer and I love the doodling she did with the gel pens! She is getting better at stenciling with pastes too.
And here is mine:
I left a few of the tags out! Six was more than enough!
I was inspired by the sunrise at the bus stop this morning - brilliant pinks, oranges and yellows masked by the cool soft tones of blueish purple clouds.....
"One can never consent to creep when one feels an impulse to soar." ~Helen Keller
Showing posts with label luminarte. Show all posts
Wednesday, January 8, 2014
Journal 52 day - week 1
Tags:
art journal,
luminarte,
mixed media,
primary elements
Friday, January 3, 2014
Say Yes to New Adventures
Hi all!
One of the things I like most about the life I have lived so far is that I have never been afraid to say yes to new adventures.
One of the things I have been struggling with lately - for some time really - is the lack of new adventures and I am unsure how to handle that.....
Don't get me wrong, jumping headlong into new adventures and living by the seat of my pants could make for some rocky rides, stress and uncertainty so I appreciate the stability I have now......
But oh how I still crave the adventure.......!
One of the things I like most about the life I have lived so far is that I have never been afraid to say yes to new adventures.
One of the things I have been struggling with lately - for some time really - is the lack of new adventures and I am unsure how to handle that.....
Don't get me wrong, jumping headlong into new adventures and living by the seat of my pants could make for some rocky rides, stress and uncertainty so I appreciate the stability I have now......
But oh how I still crave the adventure.......!
Monday, December 30, 2013
A fun new thing is hitting the shelves!
Hi all!
I hope you have all been having a wonderful Holiday season! I must admit I am looking forward to a new year - this one has been a rough ride. I am really hoping my new year includes more studio time.
Recently I was asked my a friend and Sizzix designer,Eileen Hull, to design some things for CHA using some of her new Scoreboards Dies. May I present Artist Trading Blocks!
How cute are these little guys??? And really fun too! To be quite honest I was a little perplexed when they arrived as it was something new to me but I decided to just dive right in and I had a blast. Today I am going to give you a step by step to create the center one. These will be on display at CHA in the Sizzix booth.
SO let's begin with Score Boards - what the heck are they??? Straight from the Sizzix Score Boards website:
"If it’s chipboard or mat board, then ScoreBoards Dies expand your creativity with quick and easy cuts and scoring. The first-ever product of its kind, ScoreBoards Dies produce sturdier boxes, pockets, holders and other ultra-versatile designs. Use board thickness from .040" to .055" for best results."
The Box dies create these boxes. Super easy to decorate and a snap to put together. The largest one is available now and the smaller sixes will be available soon.
So let's get started! Here is what they look like nekkid!
You need TWO pieces to create the box. Each piece has 3 sides and a tab on each end where your Score Tape will go to put them together. you can see the score lines on each one. Now when planning out your design line the two pieces up as shown so everything is facing the right way or one of your sides will be sideways (guess how I know :P) Here are the steps I used to create my flower garden Artist Trading Block in the middle of the first picture.
I began by adding texture - I can NOT pass up texture pastes and stencils, nope, just can't do it. This time I decided to do it at the very start using Modeling Paste. Let it dry.
Next I gave it a base coat of Titan Buff acrylic paint - sort of a light tan neutral color. Let it dry.
Now it's time for some shimmering color! I took 3 Primary Elements Artist Pigment Powders by Luminarte (truly the grandest of things in my studio) in Apple Blossom, French Lilac & Wintermint & I mixed them with Slow-Dri Blending Medium - this just gives me a nice liquid glaze-type paint. I randomly dry brushed them across the surfaces - I left some areas unpainted.
I wantd to give my texture a bit of extra pizzazz sso I very lightly brushed on Inka Gold in Old Silver across the raised areas with my fingertip. If I used a darker color the effect would be even more dramatic but i was going for soft here.
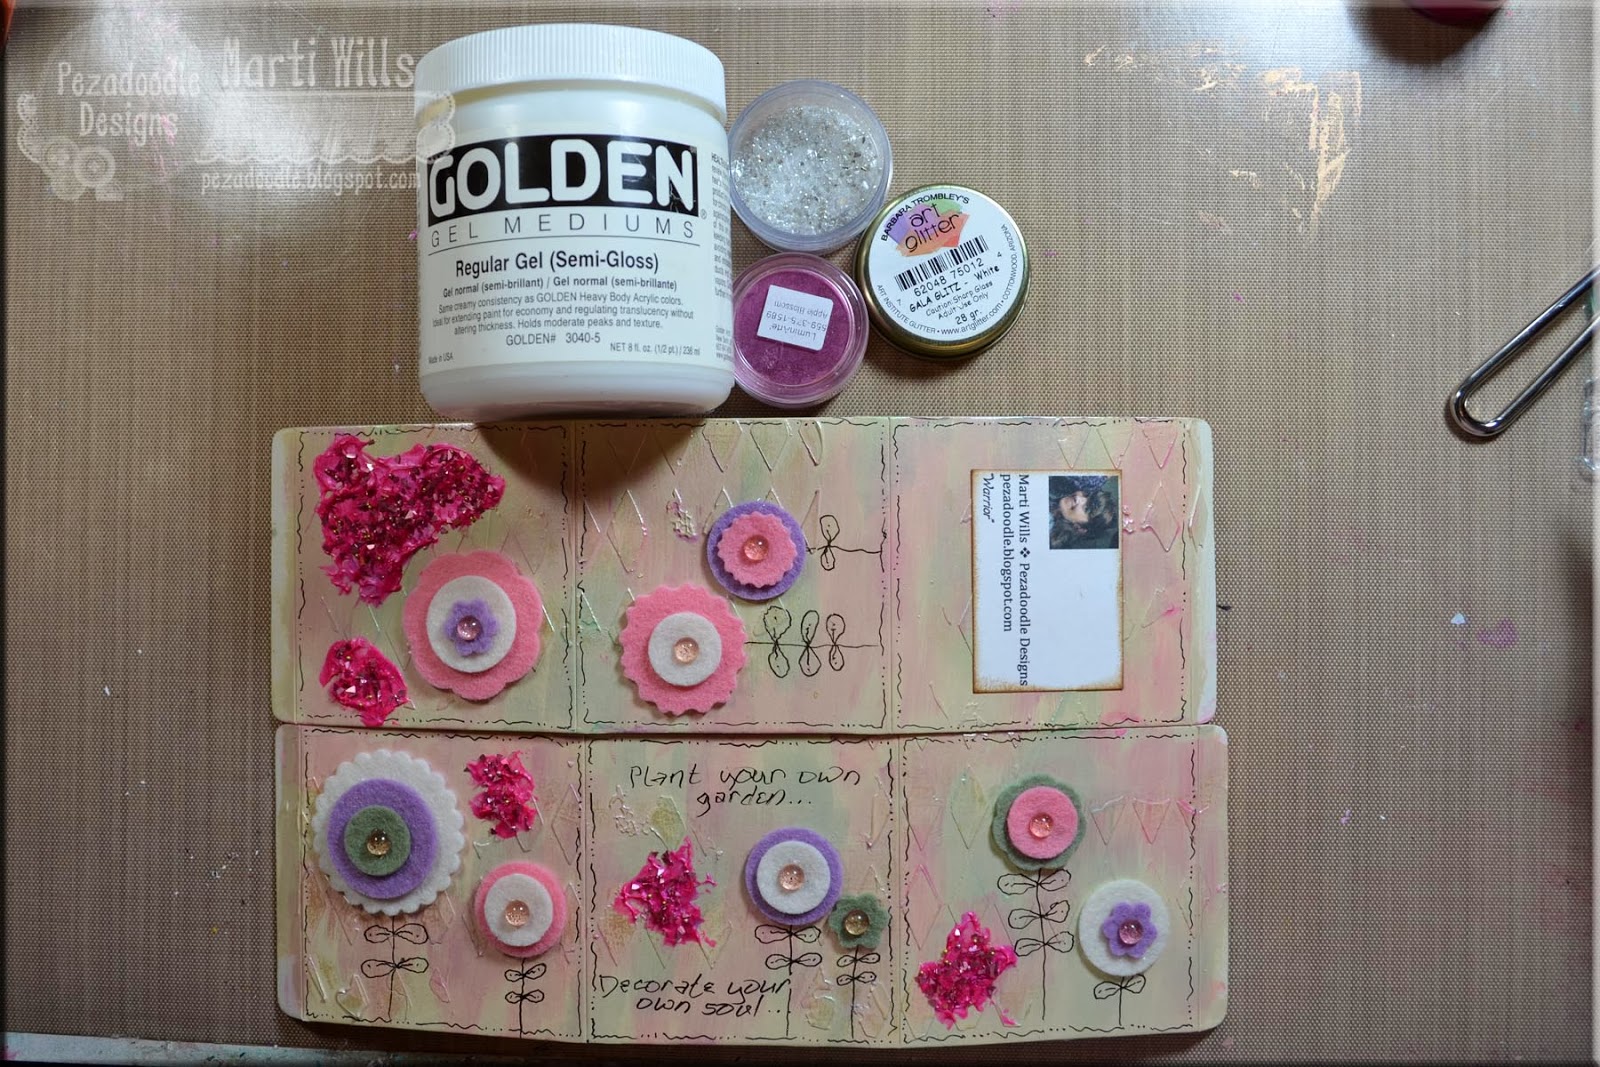
I also added some embellishing. I dug around in my misc. soft things drawer (really, there is no other way to describe it but I know exactly what I can find in there...) and I pulled out these felt die cuts and stacked them to make flowers - little glittered skittles int he middle. Then took a black pen and doodled some additional stuff and even took the plunge and WROTE my little saying in my own handwriting! Not something I am usually comfortable with!
And then, because I couldn't resist (?) I added some bright pink highly textural "messes" here and there. I mixed that same Apple Blossom Primary Elements Artist Pigment Powder into some Gel Medium and globbed it on in various places. Then I sprinkled in some pink Gala Glitz (Fab stuff - you really need some!)
It is from Art Institute Glitter and is a mix of different sizes and colors of glass glitters and different colored micro beads - neat huh?
Hubby suggested my garden needed a little ground and I thought of just the thing - something I love but had not pulled out in awhile - Elements Earth Textures - also from Art Institute Glitter. This time I dabbed on the Gel Medium straight and sprinkled it on - the gel dries clear.
And here is the finished piece - laid out and ready to glue! I really like the way this combo of steps turned out too and may use it again on some flat pieces too - I am unsure how my little blocks will fare at CHA.
Past experience has shown me that CHA handling can be a bit rough!
I will post more about the other two ATBs soon! In the meantime head over and check out what the other artists have been doing with these by visiting the ATB blog and Facebook page!
I hope you have all been having a wonderful Holiday season! I must admit I am looking forward to a new year - this one has been a rough ride. I am really hoping my new year includes more studio time.
Recently I was asked my a friend and Sizzix designer,Eileen Hull, to design some things for CHA using some of her new Scoreboards Dies. May I present Artist Trading Blocks!
How cute are these little guys??? And really fun too! To be quite honest I was a little perplexed when they arrived as it was something new to me but I decided to just dive right in and I had a blast. Today I am going to give you a step by step to create the center one. These will be on display at CHA in the Sizzix booth.
SO let's begin with Score Boards - what the heck are they??? Straight from the Sizzix Score Boards website:
"If it’s chipboard or mat board, then ScoreBoards Dies expand your creativity with quick and easy cuts and scoring. The first-ever product of its kind, ScoreBoards Dies produce sturdier boxes, pockets, holders and other ultra-versatile designs. Use board thickness from .040" to .055" for best results."
The Box dies create these boxes. Super easy to decorate and a snap to put together. The largest one is available now and the smaller sixes will be available soon.
So let's get started! Here is what they look like nekkid!
You need TWO pieces to create the box. Each piece has 3 sides and a tab on each end where your Score Tape will go to put them together. you can see the score lines on each one. Now when planning out your design line the two pieces up as shown so everything is facing the right way or one of your sides will be sideways (guess how I know :P) Here are the steps I used to create my flower garden Artist Trading Block in the middle of the first picture.
I began by adding texture - I can NOT pass up texture pastes and stencils, nope, just can't do it. This time I decided to do it at the very start using Modeling Paste. Let it dry.
Next I gave it a base coat of Titan Buff acrylic paint - sort of a light tan neutral color. Let it dry.
Now it's time for some shimmering color! I took 3 Primary Elements Artist Pigment Powders by Luminarte (truly the grandest of things in my studio) in Apple Blossom, French Lilac & Wintermint & I mixed them with Slow-Dri Blending Medium - this just gives me a nice liquid glaze-type paint. I randomly dry brushed them across the surfaces - I left some areas unpainted.
I wantd to give my texture a bit of extra pizzazz sso I very lightly brushed on Inka Gold in Old Silver across the raised areas with my fingertip. If I used a darker color the effect would be even more dramatic but i was going for soft here.
I also added some embellishing. I dug around in my misc. soft things drawer (really, there is no other way to describe it but I know exactly what I can find in there...) and I pulled out these felt die cuts and stacked them to make flowers - little glittered skittles int he middle. Then took a black pen and doodled some additional stuff and even took the plunge and WROTE my little saying in my own handwriting! Not something I am usually comfortable with!
And then, because I couldn't resist (?) I added some bright pink highly textural "messes" here and there. I mixed that same Apple Blossom Primary Elements Artist Pigment Powder into some Gel Medium and globbed it on in various places. Then I sprinkled in some pink Gala Glitz (Fab stuff - you really need some!)
It is from Art Institute Glitter and is a mix of different sizes and colors of glass glitters and different colored micro beads - neat huh?
Hubby suggested my garden needed a little ground and I thought of just the thing - something I love but had not pulled out in awhile - Elements Earth Textures - also from Art Institute Glitter. This time I dabbed on the Gel Medium straight and sprinkled it on - the gel dries clear.
And here is the finished piece - laid out and ready to glue! I really like the way this combo of steps turned out too and may use it again on some flat pieces too - I am unsure how my little blocks will fare at CHA.
Past experience has shown me that CHA handling can be a bit rough!
I will post more about the other two ATBs soon! In the meantime head over and check out what the other artists have been doing with these by visiting the ATB blog and Facebook page!
Wednesday, November 20, 2013
A traveling journal page!
Hi all!
I have finished up the last two traveling journals I have been working on this year with a group of friends from Ireland - this means mine should be making it's return to me soon!
The focus of this journal is the color yellow. I began similar to a previous post and used sequin waste as a stencil with a Viva Decor product called crystal gel - it is a shimmering gel with iridescent flakes in it. I also sponged on Oyster Silks through a plant - like stencil.
Next I mixed up some shimmering mists - I prefer to make my own using Luminarte Primary Elements Artist Pigment Powders. I like the ease of choosing my colors on a whim and the fact that is less expensive to buy the color & shimmer ONCE in the form of a powder and then use that to make a variety of different mediums. For this piece I mmixed up a yellow of course and then I also used a blue. You can see the way the two different stenciled designs show through by resisting the spray and making it pool around the designs.
I wanted to add a bit more to it so I took the same plant-like stencil and sponged on one of the newest Silks colors - Moss Green. I like to mimic and repeat colors and elements to bring some of the chaos together - since I get a little chaotic - in art AND in life! I felt like it needed a bit of a punch at the end so I grabbed my Heavy Gel Medium and some Apple Blossom Primary Elements and mixed well (see what I mean folks? This stuff is so versatile!) I smoothed it on through another stencil - the Harlequin - in a few spots. The stencils I used here are from Crafter's Workshop.
Just look at that shimmer - the Apple Blossom gel medium GLOWS and the shimmering mists I used as my base just shimmer along with the Moss Green Silks plant stenciled on. LOVE this stuff.
Stencils are one of my favorite things - I am toying with making some of my own but I am also really coveting Stencil Girl stencils right now. I swear I could probably easily spend $100 or more! Great stuff! Y'all need to check them out!
I have finished up the last two traveling journals I have been working on this year with a group of friends from Ireland - this means mine should be making it's return to me soon!
The focus of this journal is the color yellow. I began similar to a previous post and used sequin waste as a stencil with a Viva Decor product called crystal gel - it is a shimmering gel with iridescent flakes in it. I also sponged on Oyster Silks through a plant - like stencil.
Next I mixed up some shimmering mists - I prefer to make my own using Luminarte Primary Elements Artist Pigment Powders. I like the ease of choosing my colors on a whim and the fact that is less expensive to buy the color & shimmer ONCE in the form of a powder and then use that to make a variety of different mediums. For this piece I mmixed up a yellow of course and then I also used a blue. You can see the way the two different stenciled designs show through by resisting the spray and making it pool around the designs.
I wanted to add a bit more to it so I took the same plant-like stencil and sponged on one of the newest Silks colors - Moss Green. I like to mimic and repeat colors and elements to bring some of the chaos together - since I get a little chaotic - in art AND in life! I felt like it needed a bit of a punch at the end so I grabbed my Heavy Gel Medium and some Apple Blossom Primary Elements and mixed well (see what I mean folks? This stuff is so versatile!) I smoothed it on through another stencil - the Harlequin - in a few spots. The stencils I used here are from Crafter's Workshop.
Just look at that shimmer - the Apple Blossom gel medium GLOWS and the shimmering mists I used as my base just shimmer along with the Moss Green Silks plant stenciled on. LOVE this stuff.
Stencils are one of my favorite things - I am toying with making some of my own but I am also really coveting Stencil Girl stencils right now. I swear I could probably easily spend $100 or more! Great stuff! Y'all need to check them out!
Thursday, November 7, 2013
Kids Mixed Media part 2
Hi all!
I can't' believe it's Thursday! We had Monday and Tuesday off here AND the time changed - I am all sorts of throw out of whack! Add prep for Hollyn's birthday party and the 3 ringworm circus of kittens that have been quarantined in my studio for over a month and EGADS!
Today is also my last Kids Mixed Media class so they are taking home the other 2 projects they did. The second one is a Christmas wall hanging:
This is my sample. We started with a wooden circle and covered it with crumpled tissue paper. Then I had them paint reds and greens over it. Once dry, we added gold or silver paint BUT I had them apply it using Saran Wrap. they thought that was CRAZY! hahahah!
Next we painted a wooden Christmas tree shape green. Then I brought in some Gel Medium and my favorite of ALL art supplies - Luminarte Primary Elements Artist Pigment Powders. If you have not discovered these little jars of awesome you are missing out! They are pure pigment and gorgeous shimmer packed into a powder form allowing you the ultimate in versatility. They can be mixed with any medium to give you what you want. In this case they mixed the Powder with the Gel Medium for a gorgeous, semi-transparent, shimmering green gel. They spread it on the painted trees and embedded a variety of Christmas buttons, Christmas gems and silver and gold beads into it. SO VERY COOL! They were amazed!
I brought them home to adhere the trees onto the boards, add the felt snowflake and little pine cone cluster and put the twine hanger on. Fun stuff!
I can't' believe it's Thursday! We had Monday and Tuesday off here AND the time changed - I am all sorts of throw out of whack! Add prep for Hollyn's birthday party and the 3 ringworm circus of kittens that have been quarantined in my studio for over a month and EGADS!
Today is also my last Kids Mixed Media class so they are taking home the other 2 projects they did. The second one is a Christmas wall hanging:
This is my sample. We started with a wooden circle and covered it with crumpled tissue paper. Then I had them paint reds and greens over it. Once dry, we added gold or silver paint BUT I had them apply it using Saran Wrap. they thought that was CRAZY! hahahah!
Next we painted a wooden Christmas tree shape green. Then I brought in some Gel Medium and my favorite of ALL art supplies - Luminarte Primary Elements Artist Pigment Powders. If you have not discovered these little jars of awesome you are missing out! They are pure pigment and gorgeous shimmer packed into a powder form allowing you the ultimate in versatility. They can be mixed with any medium to give you what you want. In this case they mixed the Powder with the Gel Medium for a gorgeous, semi-transparent, shimmering green gel. They spread it on the painted trees and embedded a variety of Christmas buttons, Christmas gems and silver and gold beads into it. SO VERY COOL! They were amazed!
I brought them home to adhere the trees onto the boards, add the felt snowflake and little pine cone cluster and put the twine hanger on. Fun stuff!
Tags:
luminarte,
mixed media,
primary elements
Friday, November 1, 2013
Giving thanks....new Cut It Up challenge
Hi all!
I hope y'all all had a scary night of trick or treating! We had some friends over for pizza and then headed out. Each year Pezza covers a little more ground. Eventually we'll be doing the whole neighborhood!
She had a blast but she was tired this morning! She usually gets up on her own but today I had to go in and wake her up. When I went in to her room I said Pezza....and she said NO! But we managed to get ready in time and then we went to the door to leave and it was pitch black outside! I had to check the clock 3 times to make sure we had the time right!
Today kicks off a new challenge over on Cut It Up - the challenge is to do a Thanksgiving project and of course you must use a die cut. The prize up for grabs - Stampin' Up! goodies from Norma Pimentel. I have been using this design team position to do some scrapbooking - it's been a great motivator for me but I paused on this challenge - you can only have so many layouts of a turkey dinner KWIM? And then I had an idea and came up with this instead:
I decided to do a snapshot of what we are all thankful for right now. I had Pezza write hers out and the rest of us typed ours up. It's so cute to look back on little kid hand writing and how they lay things out!
I got my cut files from Designs on Cloud Nine - they are part of a set that includes some ADORABLE owls I am hoping to have time for soon! I cut it all out on my Black Cat using Make the Cut software.
I gave my acorns some texture with an embossing folder and ink. Then I wanted to give my leaves some pizzazz and I knew the new Silks Acrylic Glaze colors would be perfect! Especially if I applied it using Saran Wrap.
You can see the shimmer here - the orange leaves have Chestnut Brown, the yellow leaves have one of my all time FAVE Luminarte colors, Golden Monarch, and the burgandy leaves have one of the amazing new Iridescents, Copper.
I hope y'all can join us for the challenge on Cut It Up! Head over to the blog and check out the rest of the Design Team's projects!
She had a blast but she was tired this morning! She usually gets up on her own but today I had to go in and wake her up. When I went in to her room I said Pezza....and she said NO! But we managed to get ready in time and then we went to the door to leave and it was pitch black outside! I had to check the clock 3 times to make sure we had the time right!
Today kicks off a new challenge over on Cut It Up - the challenge is to do a Thanksgiving project and of course you must use a die cut. The prize up for grabs - Stampin' Up! goodies from Norma Pimentel. I have been using this design team position to do some scrapbooking - it's been a great motivator for me but I paused on this challenge - you can only have so many layouts of a turkey dinner KWIM? And then I had an idea and came up with this instead:
I decided to do a snapshot of what we are all thankful for right now. I had Pezza write hers out and the rest of us typed ours up. It's so cute to look back on little kid hand writing and how they lay things out!
I got my cut files from Designs on Cloud Nine - they are part of a set that includes some ADORABLE owls I am hoping to have time for soon! I cut it all out on my Black Cat using Make the Cut software.
I gave my acorns some texture with an embossing folder and ink. Then I wanted to give my leaves some pizzazz and I knew the new Silks Acrylic Glaze colors would be perfect! Especially if I applied it using Saran Wrap.
You can see the shimmer here - the orange leaves have Chestnut Brown, the yellow leaves have one of my all time FAVE Luminarte colors, Golden Monarch, and the burgandy leaves have one of the amazing new Iridescents, Copper.
I hope y'all can join us for the challenge on Cut It Up! Head over to the blog and check out the rest of the Design Team's projects!
Tags:
black cat,
cut it up,
designs on cloud 9,
LOs,
luminarte,
make the cut,
silks
Thursday, September 19, 2013
Art Journal Tutorial for you!
Hi all!
It has been a whirlwind of activity around here these days! Tuesday I had lunch with my buddy Suzanne (Scrap Bitz) and then went junk hunting around town. I didn't find anything - I am on the hunt for old fence, old doors and a desk. She found a couple cool things though and it was really nice to sit and catch up. we don't get to hang out nearly as much as we did when we were running the magazine (Through the Craft Room Door.) That morning I went to a gifted & Talented info meeting as the school is wanting to do some testing on Hollyn - I have to say I am much happier with the program in this school district than any of the ones the boys were in. So we'll see where that leads. Then I ended the night with a meeting for the Special Education Advisory Council - I was asked to be the rep for our school and while the meeting was interesting - we heard our Superintendent speak and then covered the general business of the committee - I am not sure it is the right fit for me since I have had zero experience with special education other than Pezza's very minor IEP and wouldn't know the first thing about what is needed or best practices or current research. So I may have to step down from that. Then off to Petsmart first thing this morning for my turn taking care of the kitties the Rescue I work with has there. Two very cute calicos greeted me today - no babies though - we are nearing the end of kitten season. I think my day is clear tomorrow though other than a bit of house cleaning so I am really hoping to sit and sew. What's on my sewing plate? A purse for my step mom - got some CUTE fabrics, TWO quilts I would really like to make and Fall/Halloween table linens - so yea, I need to fit quite a few sewing days in!
But today I have art journaling for ya! I have not been very good about reading blogs for some time now and I really miss it. I get most of my faves in my email and every now and then I will take a minute to check one out and see what's going on - or i may see a post on Facebook and go have a look. At this moment I have 1637 unread emails so you see what I am up against.....Anyway, I just happened to click on Tim Holtz's blog when he posted the tutorial for this month's 12 tags and I really thought it was quite good. However, I have not purchased much of anything new in years and that includes none of the mass amount of products Tim has released. SO I was lacking several of the thing she used but I decided I would just make do with what I had and see how it turned out. (Frankly I have been skeptical for some time as to whether or not I REALLY need his specific brand of stuff or if I can substitute.) ONE day I will have time to do some real tests but for now here is my version broken out into steps for you.
Here is the end result in an art journal I was working in:
And here it is step by step.
It has been a whirlwind of activity around here these days! Tuesday I had lunch with my buddy Suzanne (Scrap Bitz) and then went junk hunting around town. I didn't find anything - I am on the hunt for old fence, old doors and a desk. She found a couple cool things though and it was really nice to sit and catch up. we don't get to hang out nearly as much as we did when we were running the magazine (Through the Craft Room Door.) That morning I went to a gifted & Talented info meeting as the school is wanting to do some testing on Hollyn - I have to say I am much happier with the program in this school district than any of the ones the boys were in. So we'll see where that leads. Then I ended the night with a meeting for the Special Education Advisory Council - I was asked to be the rep for our school and while the meeting was interesting - we heard our Superintendent speak and then covered the general business of the committee - I am not sure it is the right fit for me since I have had zero experience with special education other than Pezza's very minor IEP and wouldn't know the first thing about what is needed or best practices or current research. So I may have to step down from that. Then off to Petsmart first thing this morning for my turn taking care of the kitties the Rescue I work with has there. Two very cute calicos greeted me today - no babies though - we are nearing the end of kitten season. I think my day is clear tomorrow though other than a bit of house cleaning so I am really hoping to sit and sew. What's on my sewing plate? A purse for my step mom - got some CUTE fabrics, TWO quilts I would really like to make and Fall/Halloween table linens - so yea, I need to fit quite a few sewing days in!
But today I have art journaling for ya! I have not been very good about reading blogs for some time now and I really miss it. I get most of my faves in my email and every now and then I will take a minute to check one out and see what's going on - or i may see a post on Facebook and go have a look. At this moment I have 1637 unread emails so you see what I am up against.....Anyway, I just happened to click on Tim Holtz's blog when he posted the tutorial for this month's 12 tags and I really thought it was quite good. However, I have not purchased much of anything new in years and that includes none of the mass amount of products Tim has released. SO I was lacking several of the thing she used but I decided I would just make do with what I had and see how it turned out. (Frankly I have been skeptical for some time as to whether or not I REALLY need his specific brand of stuff or if I can substitute.) ONE day I will have time to do some real tests but for now here is my version broken out into steps for you.
Here is the end result in an art journal I was working in:
And here it is step by step.
Now Tim started with embossing paste by Wendi Vechi which I don't have BUT I do have loads of other embossing stuff. Nor do I have his stencils but they are too small for me anyway so I used a Crafter's Workshop stencil I already own and used Viva Decor Crystal Gel to emboss with. Now right away I know this is going to react differently because I am pretty sure Wendi's paste is a matte white and the one I used was a clear gloss but whatevs - it sure is purty! And of course it worked like a DREAM with the stencil as EVERY Viva Decor (Viva Colour) product always does. HMMMM not sure you can actually get this crystal gel so lemme look for a link.......YES of course Susana has it at SCACD! So there ya go if you are wanting some. Ok let that dry.
NEXT we take another stencil - again Crafter's Workshop - and acrylic paint - in this case I used Luminarte Silks in Ice - you can barely see it on the bottom left and upper right corners. I just used a sponge to pounce a small bit of paint across the stencil - if you use too much paint it will seep underneath and that is no good! Again let it dry.
NOW we want to drench it in color. I used Luminarte Radiant Rain mists. I began by misting the pages with water and then with Radiant Rains in Lemon Drop (old style bottle - been using this stuff for AGES), Fern, Teal Zircon and Apple Blossom - GORGEOUS!!!! Now one real important point here - page prep. I am not using gesso'ed pages. If I had gesso on here it would sort of resisit the sprays and I want them to soak in so I have not "sealed" the paper with gesso. I know there are some mixed media artists who insist you MUST MUST MUST always start with gesso - NOT the case. It depends on what mediums (Products) you are using and the effect you want. Now notice how we have two different effects with our two different types of stenciling - the Silks has taken on some of the color so it is a faint image and the Crystal Gel has resisted it PLUS because it is raised the color has pooled around the stenciled bits and on top.
Now we are using ANOTHER stencil and some brown Distress Ink - which I do have since it came out like a hundred years ago - all the new seasonal colors - not so much. BUT I do have a few. Ok now we are going to add yet another stencil layer using our brown distress ink and a foam blender - Walnut Stain and I layered it in a few areas. Next I used a smaller design stencil - in this case very small sized sequin waste - to add yet another layer using a colored Distress Ink - Broken China here and layered yet again. I noticed a really coll thing happens when you do this - the blue ink reacts with the brown ink and almost moves it out of the way. It also shows up differently where it is used over the Silks image so the Silks image shows through.
FUN stuff! And we're still not done!
Now some stamping with Black Soot Distress Ink. I used some stamps I carved myself - SO easy to do! See my previous post about carving them. I LOVE these leaves I drew so I used them.
We're ready for the final steps! I LOVE to put quotes on my pages but you could use anything - stamped images, printed clip art, colored images... I inked the edges and used my handy dandy edge distresser - the crazy Distrezz All or whatever it's called is too much for me :P
Adhere them to the page and then I used a charcoal pencil to go around the edges and smeared it with a paper blending stump and my finger to really set them off.
The journal I was working in was not actually mine - it is one of the Circle Journals I am participating in. I did two of them in this session:
I carved the stamp used on this page from a Dover Pictura image - A tutorial for that will be coming next week! So whadda ya think?
Subscribe to:
Posts (Atom)