Showing posts with label embossing powder. Show all posts

Friday, November 21, 2014

All that shimmers...!

Hi all!

Long time no see!  We've been having nothing but fun over here!  After a rough start in school Pezza seems to have settled in and we have a grandbaby due in a month!  Trevor, his girlfriend Jess and the baby will all be staying with us.  EGADS!!!

Since last minute is my favorite way to do things I thought HEY I think I'll make all my Christmas cards this year...RIGHT before Thanksgiving.....Gotta keep things exciting!

The following challenges inspired me:

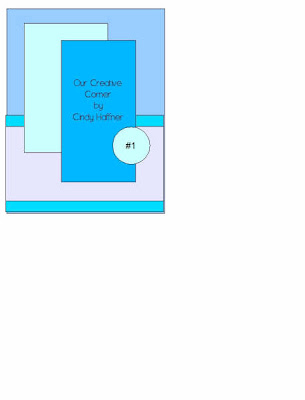
SCS - Sketch challenge
4 Crafty Chicks - Make It Sparkle
Time Out Challenge - Embossing with sparkle


Since I have to make more cards than I have even figured out yet I wanted to keep it simple and repeatable but I still want some pizzazz so I reached for my jars of gorgeous shimmering Silks Acrylic Glaze.


I started with a white piece of cardstock and just swiped over it with Moss Green for the green cards and Carribean Mist for the blue ones.


The sparkle really comes through at the slightest tilt!


I stamped the background images in black Archival Ink.  I stamped the focal image in VersMark and used white embossing powder.  I wish the camera could adequately capture the amazing sparkle of the Silks!

Here is the whole collection for this batch - just 6 or 7 more batches to go!


Have you tried the Silks Acrylic Glazes??? A wonderfully sparkling, versatile, easy to use paint - check them out!

Friday, December 5, 2008

Ornament swap - gotta love those alcohol inks!!

**disclaimer** I am severely ribbon challenged so these were fabulous until i got to that part but i did my best...

These are both ceramic ornaments from Michaels:

i covered the ornaments with alcohol inks and metallic mixatives. then i stamped with versamark and covered with embossing powder and melted. i LOVE the look. a tip - when i did the sides i used a qtip to get in the tiny spaces!

Saturday, November 1, 2008

hi all! i hope everyone had tons of fun trick or treating or whatever you might do on halloween! we were thrilled when we finally got pezzy to agree to put her costume on (you'll be seeing those pics soon in a LO) and once she got going she loved trick or treating. she even roared for a few of our neighbors! at one point she looked at hubby and said daddy! i am a trick or treating baby! when we got home she helped hand out candy too!

todays' post is picture heavy but worth it (i think). want to do individual ornaments for folks in a jiffy? alcohol inks and porcelain!


Here is what I have so far - instructions follow:

first the basics - backgrounds. i found two ceramic ornaments at Michaels - the rest are from my mom's stash of porcelain! i WILL be putting together a one-time only order for porcelain ornaments THIS WEEK so if you want some info will follow probably on monday BE SURE TO CHECK IN!

SO of course i am using alcohol inks for the base colors as porcelain is slick - just what alcohol ink is made for!

Other supplies you will want to have for the various techniques: versamark, brilliance metallic inks, stamps, stickles, liquid pearls, dimensional pearls and lots of embossing powders! the best are detail clear, embossing tinsels (come in iridescent bridal, silver, gold, red and green), white and the distress embossing powders - all of these are available through my webstore along with the versamark, brilliance inks, liquid pearls, dimensional pearls and stickles. The metallic mixatives are especially wonderful on these - here i used red pepper, cranberry and gold mixative - it creates a gorgeous marbled look with gold veins. Be sure to let the alcohol ink dry thoroughly before going on with additional steps. i found some of the ornament surfaces were not exactly flat and level so i stamped without putting my stamps on a block so there would be some flexibility.

Now the details of each one:

STamped a solid poinsettia image from Inkadinkado's Peppermint Twist set using versamark. Covered with gold embossing tinsel and heated to melt. accented the open work with gold liquid pearls.

Stamped the holly leaf from Inkadinkado's Christmas Classics set using versamark, covered with silver embossing tinsels and heated to melt. accented edges with silver stickles.

background is copper mixative with meadow and lettuce alcohol inks and LOTS of blending solution to soften the colors. the hanger portion and bottom ringer portion are straight copper mixative. stamped the pine cones from Inkadinkados Holiday Classics set using versamark and then "colored" them using distress embossing powders and heated to melt. dots are Lettuce Dimensional pearls.

I used stonewashed and denim alcohol inks with pearl mixative. i stamped some super little studio Gs using sky blue brilliance ink and then covered it with frosted crystal embossing antiquities powder and heated to melt so the ink wouldn't smudge. added details with silver stickles.

this ornament is done same as above.

Used the same alcohol inks again but with silver mixative and less blending solution. stamped snowflakes in versamark and used silver embossing tinsel and white embossing powders. heated to melt. used crystal stickles for dots along the edge.

Meadow and lettuce alcohol inks with gold mixative. stamped image from Inkadinkados Winter Shapes set using galaxy gold brilliance ink which i heated with the heat gun and it dried (doesn't work for all of them for some reason). dots and "trunk" are gold liquid pearls.

stamped the silent whisper image using black brilliance ink and heated to dry. colored the image using my copics (yep copics are alcohol markers so color away on slick surfaces!) snowman is covered in crystal ice stickles. open work edge is done using thyme brilliance ink just tapped directly on from the pad. then i covered it in frosted crystals antiquities embossing powder and heated to melt.

so there you have it folks - a variety of ideas and successful products for porcelain ornaments. remember if you can't find them near you tune in monday and i will post what i will be ordering so we can do it all at once!

now off - lots of work to do today!

Wednesday, June 18, 2008

Embossing Tutorial #3 and Technostamper sketch

Tutorial #3 yay!! everyone loved yesterday's which was a really fun one! today we are making an embossed background ala Tim Holtz. I got this technique from one of his 12 tags of Christmas (a MUST-SEE on his blog if you haven't already!) lord went over to grab the link and got distracted - his blog is so chock full of ranger yummy goodness!!!! Todays card uses the sketch from Mary Jo - another of my FAVES:

and here is my take using a background technique done with embossing powders which i will show you today:


Here are a couple other cards done using this same background technique:


(excuse the crooked wording - i was new to stamping at the time!!)

I used a Ranger embossing tinsel in bridal on these for extra shimmeriness but this can also be done with clear and looks really gorgeous as well. So supplies you need: light colored cardstock cut to the size you need, versamark, embossing powder, heat tool, dark coordinating ink, foam blending tool.


Cover your cardstock piece with Versamark - Just stamp the pad right on to the paper. you will see the versamark on the paper so you can be sure to get a good solid even coverage.


Next cover it with embossing powder. For some of the powders I use ALOT i have them in tupperware containers so i don't have to fool with the tray - i just dump the powder on over the container and the excess goes right back where it belongs :) once your cardstock is covered you want to hold it on the edges and flick the back really hard over the trash can to knock some of the powder back off. You want some random blank spaces for your darker ink. i even rub some areas lightly with my fingers if i need to - it takes a few good flicks! now heat it with a heat gun under good lighting and melt it.

Let it cool completely and then take your foam blending tool and ink it up with your darker ink color. Dab and smoosh the ink all over the cardstock, working the ink into any crevices that might be free of embossing.


Once it is covered take a paper towel and wipe the ink off of the embossed areas - the embossing acts as a resist so the ink won't stick. you will be left with a bit of ink here and there in the un-embossed areas.


On the first card above i also used the versamark as a watermark pad on the green panel beneath the flower. i took my Butterflies a swirl stamp and inked it up with versamark, stamped on the panel and then let it dry. nice subtle effect. also to the right another studio G stamp - crisp and clear once it is sanded a bit!

I'd love to see your creations and hear what you think of the tutorials so far! next up - the fabulous distress embossing powders!!!!! LOVE these!!

Tuesday, June 17, 2008

Tutorial #2 scratch n sniff embossing and some MOJO!!

Today is the second tutorial for embossing. I made my sample using this weeks fab sketch from julee over on poetic artistry. I had a number of raves about the embossed oranges at the end of the last tutorial so I decided to use them again since they are perfect for todays lesson - scratch n sniff cards - YEP! my oranges smell like oranges!! Now how cool is that? This was our technique for last month's technique club with my SU demo, Stacey. The oranges are from SU's Tart N Tangy set that was on special recently.


So HOW do we do this? Unsweetened kool-aid mixed into your clear embossing powder!! In fact you can mix ANY unsweetened powder in - I am anxious to try some other such as cocoa powder, nutmeg, cinnamon - oh imagine the Christmas cards :) - just remember UNSWEETENED because sugar will burn when you melt the powder with your heat gun.

so the ratio is 1 part powder and 2 parts clear embossing powder. some people use actual teaspoons but i have a favorite measuring scoop i use for everything - you will see it often:

Just a plastic pallette knife - i have a couple. so for this card i just took 4 scoops from the kool aid and 8 scoops from the clear embossing powder:


And then mix them well:

NOW the powder will have a slight tint from the powder but not much so i swiped with my embossing buddy and then I stamped my image using ranger sunset orange pigment pad - remember pigment inks stay wet long enough to emboss. You can use versamark for this too. Then sprinkle on your embossing mixture just like before and tap off the excess. This is best with a stamp that is solid or at least has a lot of surface area to cover with the powder - the more powder the more scent! Here is the image un-heated - under the OTT light you can see the grainyness of the powder.

NOw heat until the powder melts - remember not to over heat:

Be sure to let the image cool completely before handling or the kool aid may smudge a bit! now when you scratch the oranges you smell oranges! For my card i smudged the edges with more sunset orange dye ink (so it dried faster) and mounted according to the sketch i was following. the orange dots are orange stickles. The sentiment is a studio G stamp from my vast collection. Remember for these - sand them a bit before first use and your image will be crisp and clear!

Tomorrow we will do a background with shimmery embossing powder and then we will be on to distress embossing powders and even some UTEE!

enjoy!!!

Sunday, June 15, 2008

Tutorial - embossing and NEW sketches to play!!!!!

HOORAY!! there is a new sketch blog up and running - i know...i have a hard enought ime keeping up with the ones i already love, but a friend of mine who's work i ADORE is one of the girls doing it **waving to Amy - go girl!** So here is the first sketch:And my card - a father's day card for my dad - yes i just made it - somehow i thought father's day was next weekend EEEEEK!!!!! oh well he is late for everything anyway so it's all good. I turned the sketch on it's side and changed where i put my little embellishment to fit my image.

I have had a great many requests for tutorials on the ranger and other products i sell in the store so i have finally given in and today will be the first installment. i will focus on one product family each week and post tutorials using it in a variety of ways since the products can be SO versatile. This week we will look at embossing techniques with different types of embossing powders. Today is the basics using clear embossing powders. The card above has two techniques with the clear detail embossing powder.

First your basic tools:


(OK minus all the junk in the background) - you need Versamark, colored embossing or pigment inks - Rangers distress inks work well and their new adirondack pigment inks and the brilliance dew drop pigment inks all work very well. Clear embossing powder - i use Ranger powders because i find them to be superior to stampendous. SU powders are also good but i have only used clear and rainbow ice. I have not tried others..... a heat gun, i have had the one above for years and years. i'd like to replace it with the one from ranger BUT it has not been in stock for months on end.....I also highly recommend getting the little tray above as it is just much more convenient and helps save the excess powder sort of like when you glitter something and shake off the excess. Also an embossing buddy - mine is from SU, i think they have some at Michaels - this eliminates static cling and oils, etc that may make some powder stick where you don't want it.

for the first image, Dancing with Pezzy, I want embossed black outlines so after swiping the embossing buddy across the cardstock I will ink up using rangers pitch black pigment ink and stmp onto my paper. pour clear embossing powder over the image - you don't need to rush so that you make yourself nervous as the ink will stay wet for several minutes. gently shake off the excess, lightly tap the back if necessary but not too hard or you could kock off the powder you want too.

In the picture above i tried to show you the unmelted powder - you can see the graininess before you heat it. i ALWAYS heat under an ott light so i can see the change in the powder take place as it melts. if you overheat the powder will melt into the paper and disappear or you could burn your paper. For most powders you will SEE the difference under a good light as the grains melt into each other and become shiny.

Here is the image completed. notice how shiny black the lines are and they have a raised surface from the paper.

Next we will do our background piece using Drop Scallops. Embossing powder acts as a resist. I swipe the cardstock with the embossing buddy. Ink up the background stamp with the versamark. Versamark is a colorless, versatile sticky ink. Stamp onto your cardstock and then cover in clear embossing powder. Heat until melted and shiny:


Next i want to color my background to make my design pop out. I ADORE the ranger foam ink blending tool. I wanted to do something in yellows and greens to match Pezzy so i picked out a couple inks to start with:

I ink up one short side of the foam with one color. The trick to getting a gorgeous, soft covering of color is to keep the tool in motion - i work over a non-stick craft sheet and touch the foam lightly to the sheet and start moving it in a circular motion and then move onto the paper. this also makes the edges automatically darker (works FAB for cricut cut detailing too).
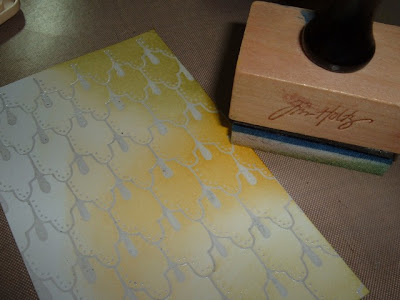
i ended up adding two other colors to get just the look i wanted. once the piece is covered in ink i lightly wipe it with a paper towel to "shine up" the embossed image and get any ink off of it.

Below are two images stamped with colored pigment ink and then clear embossed to show the difference. The top two are embossed and the bottom two are not.

I will cover other powders and techniques throughout the week including the fantastic distress embossing powders so stay tuned!!! Have fun!