Monday, June 30, 2008

Coming up for air...

Super quick post today - continuation of the last perfect pearls tutorial. i have spent the last 2 days in shipping h*** - HAHHAHAHAHHA - we are getting both series 15 and 16 out as quickly as we can. saturday was spent sorting - they DO NOT arrive nicely arranged into individual sets. yesterday was spent printing labels and packaging up. so be patient!!

i HAD to take a break from it all so i finished the piece i started using Perfect Pearls on black and also did a couple other things just to show you some other options - they have not been made into cards yet...

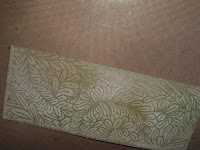
I stamped in versamark on black and sprinkled the Perfect Pearls powder on randomly in different colors, swished it around and brushed off the excess. Lightly misted with a mini mister (the mist needs to be very fine) it to set it. I stamped the Butterflies a swirl image in versamark and this time did a more controlled application of the perfect pearls. i dipped the brush tip a tiny bit into the powder and then brushed it on the image where i wanted that color. no need to wash your brush in between colors. Once i had every part of the image colored with powder i brushed off the excess real well and then lightly misted to set the powder.


these two images are stampscapes - i have been playing with them more lately and just added to my collection - kevin told me they would be shipping today - CAN'T WAIT!! i have two pics because one shows the stamp and the colors better and the other shows the pure shimmery-ness better - so hard to truly capture the magnificance of the perfect pearls in pics. they really are just gorgeous!!!


I will be back to shipping throughout the day today. i DO still plan on having our Pearl Mist tutorial up tomorrow - you will NOT want to miss that one!!

Also be sure and check Cat's blog to see what she has been up to with Perfect Pearls too! Remember the supplies can be purchased right here in my web store!


Sunday, June 29, 2008

perfect pearls - tutorial #1

and we're back up and running with tutorials! YAY! so next product focus is Perfect Pearls - little pots of gorgeous shimmering powder that can be used in lots of ways. these are different than other mica powders like pearl ex because the binder is built in so no need to use gum arabic.


the sample card is for my brother - main image is two stampscapes stamps colored with copics. panel along the bottom is a background stamp covered in various green perfect pearls powders. that is what i will show you today. and of course there are bead pops on the corners - when are there NOT....


first supplies: image stamp - doesn't have to be a background, cardstock cut to size, dye ink and foam blender if you want to color your cardstock a bit, versamark pad, perfect pearls powder(s), mini mister with water, small soft brush (cheap) and large soft brush.


i colored my cardstock a bit so it was not stark white - optional. or use colored carfdstock or even black which is very effective with perfect pearls. be sure to let it dry or use a quick zap of your heat gun.


have your perfect pearls open and ready. ink up your stamp really well with versamark (or perfect medium but i prefer versamark). stamp on to cardstock.


dip your small brush into the perfect pearls powder. now there are two ways to apply the powder. mine is a background and i want the greens sort of random. so i hold the brush over the image and tap it in various spots with the three different greens so it is spread out - you don't ned to cover completely - a little goes a long way. the other option is to simply dip your brush in and then lightly swish it over the image where you want the colors for a more controlled look - almost like painting.


then for the background randomness i just swished my brush around lightly until powder was stuck on the whole image. it will stick to the versamark.


notice there is extra powder left over - like using glitter.


use the large soft brush to swipe away the excess.


now just your image is colored - there will be some shimmer to the whole thing which can't be helped but the image will be most vibrant.


Edited to add: Now mist the whole piece lightly with plain water to set the powder. Your cardstock WILL curl at first - DON'T PANIC!!! this is normal - it WILL flatten back out as it dries - i don't know why - it's just magic....now mount/use as you want!

how easy is that!!!

I also wanted to have a sample to show you of the Perfect Pearls used on black cardstock - however due to an early rising baby the card is not done but here is the start of it! perhaps i will complete it later....but you can still see how gorgeous it looks using the pearls on black!
Be sure to check out Cat's sample too!!!! it should be up later this morning!

be sure to stay tuned for more this week!!!! next up - making your own shimmering mist - more versatile and economical!

happy stampin!!


Saturday, June 28, 2008

inkadinkado update and studio g announcements and more

hi all!!


quick post as i have work to do!!! i have had many requests for the inkadinkado $1 stamps out at Joanns. i CAN get them in. unfortunately i CANNOT sell them for $1 - Joanns gets special wholesale pricing *barf* i can do the full set for $40 - that's $1.66 a piece and it's the best i can do. so order if you are interested :)


Tsukineko goodies are streaming in so i have been organizing that and have this enticing pic of the memento dew drops for you:

Does it get yummier than that???? wait for the brilliance dew drops and encore metallics dew drops to make the same appearance!!! hahahahah!!


studio G - i know some Ms don't even have series 14 out yet (mine included *cries*) but i have pics of the next one up and have updated my web gallery/studio G shrine :P so drum roll - series 17 - very different look - scrapbooking greared and due out end of July (which apparently means Christmas in my area...)


Cute huh? glad to see they are really trying to mix things up a bit for us!


next studio G update - i did a precursry digging in those boxes i posted yesterday - looks like all series 16 so crossing my fingers for more boxes to arrive today.


i may be scarce this weekend and early next week - you know what i'll be doing! sorting and packaging, sorting and packaging. i WILL have the first in the perfect pearls tutorials up tomorrow though. you do NOT want to miss these - they are SO yummy!!!!!!


Friday, June 27, 2008

Thinking Outside The Block Fridays & Studio G update

Is it Friday already??!! Before we get into our tutorial a studio G update - since today is sort of all about Studio G or at least those annoying little blocks we have all grown to hate but i hope to help you learn to love!!

All of the studio G items have arrived!!!

you will receive a shipping notice when i print your label - international folks just know they are on their way as i will probably not be able to get you an email in a timely manner! i am down my two sweat shop workers as they are off visiting their dad (my two teenage boys) so i will be on my own for this one! HAHHAHA!

and now on to the good stuff - Let me start by saying this is NOT my idea - i totally scraplifted this from my friend Jen - see hers here. And now my friends what you have are adorable little wall hangings!

These two are matching - one for me and one for my mom.

i love the bead pops from sugar and scraps around the edges.

This is a larger one that says Welcome and is hanging in my foyer. closer pics later in the tutorial!

now for supplies - blocks, patterned paper, mod podge, brayer (optional), brilliance pearlescent dew drops or other pigment ink pad, stamps, die cuts or stickers, foam blender, zip dry glue or glossy accents, bead pops and stickles.


start by cutting the squares of patterned paper for the back of your blocks. i just lay them down and mark it - forget the ruler.


on this one for the foyer i used different patterns. on the art one i used the same paper for all of the blocks.


apply a thin layer of mod podge to the block - i use a foam brush. it doesn't need to be very thick.


i find it helps to use my brayer to smooth it out and get the air bubbles out. Check it from the front to be sure.


here they are all covered on the back. now if you are sloppy like me they also have smudges of mod podge on the front or hang over one edge a bit. i used the edge of my plastic tim holtz ruler to get the smudges off, just be careful not to scratch up the block. trim edges with exacto knife if needed.


now for the stamping - ahhhh LOVE it. i used crimson brilliance pearlescent dew drop ink here so it would match my foyer wall. i used various studio g stamps from series 11 (crazy those peeps who say they never use theirs - mine are out constantly!!) i decided the top and bottom block would have an edge stamp on them and then i also decided to push them all together so the stamps go over the edge of one on to the other and i just stamped randomly. REMEMBER to dry the ink with your heat gun.

here you can see how they overlap and the edge stamp on the bottom. the pics don't begin to capture the shimmer - you'll just have to trust me on that one!!


I cut my letters with the base camp cart on my cricut and the top and bottom design from the home accents cart (a MUST HAVE if you don't already own it!) Notice they don't really stand out very well. The solid paper is SU certainly celery and patterned paper is also certainly celery.


i took my chocolate pearlescent dew drop ink and my foam blender (and this is what i most love about the foam blender) and i dabbed the foam a bit on the ink pad and then just rubbed and smudged lightly on the cricut die cuts. these makes edging those intricate cuts SO easy - it sort of automatically makes the edges darker and now you can see they stand out much better. it will also highlight the detail cuts on pieces with those.


now for the ribbon hanger. i used more mod podge and attached a very wide celery ribbon (Michaels) - i turned each block face down and laid the ribbon on top so i could line them up. I left a piece at the top and looped it back to make a hanger and then tied another piece around it in a bow.


the whole 3D effect of these little blocks just fascinates me (i know it doesn't take much does it?!) i dotted Dimensional Pearls along the edges in Lettuce which matches perfectly.


these give you a closer look - sort of!

and now for some shippin fun!!! you may not see me for a couple days!! ha ha ha!! If you make a block project and upload to SCS please use TOTB so we can view them in one place!

Thursday, June 26, 2008

oh my!!

has it really been since MONDAY that i last posted???? ahh well company is gone now so i can get myself back in order! tomorrow will be Thinking Outside The Block friday and tutorials will start back up on Saturday - next product focus Perfect Pearls powders. If you have not played with these yet you are missing out!! if you love shimmer then be sure and "tune in" for exciting ideas both here and on Catherine's blog. and don't miss block fun tomorrow - the new studio Gs should be on my doorstep today or tomorrow so you will be recieving yet more blocks you don't need - until you see what we have come up with on Fridays!!

happy stampin!

Monday, June 23, 2008

SFYTT and Distress embossing powder

I am back with a tutorial for distress embossing powder! YAY!! these are absolutely increedible if you have never used them. they have a totally different look from typical embossing powders. the sample i have uses this weeks Sketch For You To Try from Jen's blog.


and here is my card - this stamp is perfect for these powders:


The big difference is in the finished look - most embossing powders result in a smooth raised image. distress embossing powders have a texture more like fine sandpaper and "rub off" a bit for a somewhat worn look. they also come in ALOT of colors just perfect for the distress look.


Supplies: image stamp - a stamp with a lot of surface area is better - these powders are not as stunning on line stamps. stamps done in sort of a sketch form are ideal. pezadoodle has a line of these coming out soon that have been designed specifically with distress embossing powder techniques in mind. in addition you need your embossing buddy, piece of cardstock cut to size, versamark, various colors of distress embossing powder, heat tool.


the first thing you must do is shake the distress powders really well and open them all up so they are ready. swipe cardstock with embossing buddy and then ink up your stamp with the versamark and stamp on your cardstock.


Now carefully take a pinch of your first color in your thumb and forefinger. hold it over the area of your stamp that you want that color. wiggle your thumb and forefinger ever so slightly so a tiny bit of powder falls onto the image - this gives you some control over where you "color"


Continue with all of your colors until the image is covered with powders. carefully lift it up and hold it over a trash can (or tray if you want to save the mixed colors). gently tap your fingers on the underside of the card so the powders dance around a bit but stay mostly in place - this will ensure good coverage. dump the excess.


the colors are not going to be EXACTLY only where you wanted them - this is not an exact technique but they should be mostly where you intended them to be! now working under a strong light so you can see well, heat the powders and melt them. it is very difficult to see the change but they don't take any longer than regular powders. let the image cool completely before touching. they will all rub off if still warm. once cool test an edge to make sure they are melted down. if they are not you can re-heat a bit. if they are then rub all over the image to release the distress crystals. at this point you can add matching distress ink to the edges or even onto the image itself with blending foam.


to show the difference i did a line image with this same technique. it isn't that it looks bad you just don't get the full effect of what these powders can really do.

keep an eye out for more tutorials - things will become more regular once my company is gone!! next up i will focus on perfect pearls powders - these things are INCREDIBLE!! in addition there are other exciting things happening here at the Pez-A-Doodle Studios. All Tsukineko products are in the mail and on their way to us so those orders will be shipping in the next few days. I am still working on getting the Inkadinkado $1 clear stamps in so watch for an announcement on those SOON! new stamps are in production and these are really unique! a collaboration between us and sugar and scraps - look for those in less than a month!

have a fun day!!!

Sunday, June 22, 2008

ugh apologies all around!!!
SO SORRY i have not posted the next tutorial!!! my mother has been in town and then my brother arrived yesterday AND the boys left for their dad's yesterday - needless to say i have not got much done!!! plus my mom is sleeping down in the basement where my scraproom is so i can't get in there at my usual time and play!!!

updates on studio G series 14 - no luck at my M's so far - doubt i will get much for this one - i'm hoping i get a set for myself!!!

series 15 & 16, ink pads and wood alphas - i was told on Friday they are behind on shipping - some have gone out but others have not. mine should be going out this week - CROSS YOUR FINGERS!!

Inkadinkado $1 clear stamps - paperwork is still being processed but i hope to get final word this week!

tsukineko inks - brilliance, encore, versamagic - those should begin arriving this week too!

hoping things get back to normal tomorrow!!!