Hi all!
I hope you have all been having a wonderful Holiday season! I must admit I am looking forward to a new year - this one has been a rough ride. I am really hoping my new year includes more studio time.
Recently I was asked my a friend and Sizzix designer,Eileen Hull, to design some things for CHA using some of her new Scoreboards Dies. May I present Artist Trading Blocks!
How cute are these little guys??? And really fun too! To be quite honest I was a little perplexed when they arrived as it was something new to me but I decided to just dive right in and I had a blast. Today I am going to give you a step by step to create the center one. These will be on display at CHA in the Sizzix booth.
SO let's begin with Score Boards - what the heck are they??? Straight from the Sizzix Score Boards website:
"If it’s chipboard or mat board, then ScoreBoards Dies expand your creativity with quick and easy cuts and scoring. The first-ever product of its kind, ScoreBoards Dies produce sturdier boxes, pockets, holders and other ultra-versatile designs. Use board thickness from .040" to .055" for best results."
The Box dies create these boxes. Super easy to decorate and a snap to put together. The largest one is available now and the smaller sixes will be available soon.
So let's get started! Here is what they look like nekkid!
You need TWO pieces to create the box. Each piece has 3 sides and a tab on each end where your Score Tape will go to put them together. you can see the score lines on each one. Now when planning out your design line the two pieces up as shown so everything is facing the right way or one of your sides will be sideways (guess how I know :P) Here are the steps I used to create my flower garden Artist Trading Block in the middle of the first picture.
I began by adding texture - I can NOT pass up texture pastes and stencils, nope, just can't do it. This time I decided to do it at the very start using Modeling Paste. Let it dry.
Next I gave it a base coat of Titan Buff acrylic paint - sort of a light tan neutral color. Let it dry.
Now it's time for some shimmering color! I took 3 Primary Elements Artist Pigment Powders by Luminarte (truly the grandest of things in my studio) in Apple Blossom, French Lilac & Wintermint & I mixed them with Slow-Dri Blending Medium - this just gives me a nice liquid glaze-type paint. I randomly dry brushed them across the surfaces - I left some areas unpainted.
I wantd to give my texture a bit of extra pizzazz sso I very lightly brushed on Inka Gold in Old Silver across the raised areas with my fingertip. If I used a darker color the effect would be even more dramatic but i was going for soft here.
I also added some embellishing. I dug around in my misc. soft things drawer (really, there is no other way to describe it but I know exactly what I can find in there...) and I pulled out these felt die cuts and stacked them to make flowers - little glittered skittles int he middle. Then took a black pen and doodled some additional stuff and even took the plunge and WROTE my little saying in my own handwriting! Not something I am usually comfortable with!
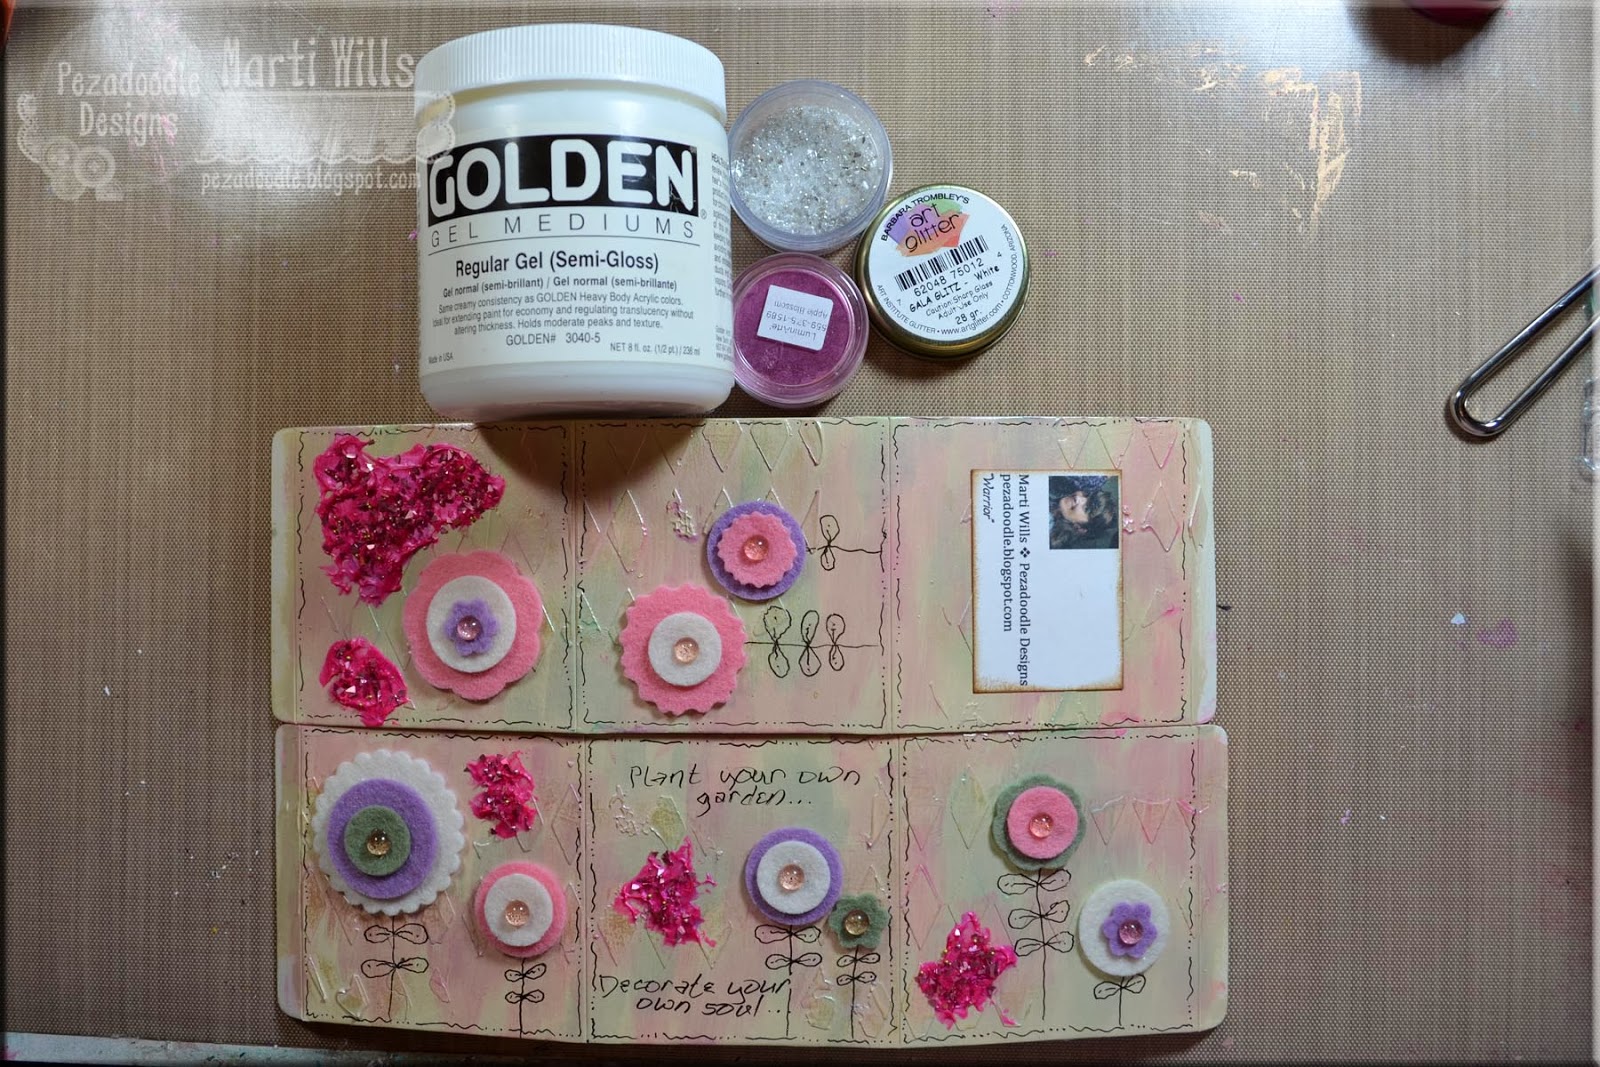
And then, because I couldn't resist (?) I added some bright pink highly textural "messes" here and there. I mixed that same Apple Blossom Primary Elements Artist Pigment Powder into some Gel Medium and globbed it on in various places. Then I sprinkled in some pink Gala Glitz (Fab stuff - you really need some!)
It is from Art Institute Glitter and is a mix of different sizes and colors of glass glitters and different colored micro beads - neat huh?
Hubby suggested my garden needed a little ground and I thought of just the thing - something I love but had not pulled out in awhile - Elements Earth Textures - also from Art Institute Glitter. This time I dabbed on the Gel Medium straight and sprinkled it on - the gel dries clear.
And here is the finished piece - laid out and ready to glue! I really like the way this combo of steps turned out too and may use it again on some flat pieces too - I am unsure how my little blocks will fare at CHA.
Past experience has shown me that CHA handling can be a bit rough!
I will post more about the other two ATBs soon! In the meantime head over and check out what the other artists have been doing with these by visiting the ATB blog and Facebook page!
Monday, December 30, 2013
Friday, November 29, 2013
Cut It Up challenge time!
Hi all!
I hope y'all had a wonderful Turkey day and stuffed yourselves silly! I know I did - on both counts! We headed to the in-laws for lunch and then a friend's house afterward for a bit. So shopping for me as I think all of the stores should stay closed on Thanksgiving! Plus it ruins the insanity of Black Friday - I liked it better when it ALL started at 4am on Friday. I was a faithful participant for ages but now it seems lacking. I can't go out anyway this year as Kevin cannot watch Pezza and I am not bringing her out in that. She is not a good shopping companion on a normal trip! The only thing I am planning to do is take advantage of the 50% of entire purchase from noon - 10pm at Michaels. I have been wanting to add to my acrylic paint stash and those little tubes can run as much as $10+!
Little Miss Pezza Lou Who turned 7 this month (and we all lived to tell about it!) I decided to go the digital route for her party invitations - easier to mass produce! I used the It's Your Big Day collection from Sweet Shoppe and put these together:
Then it came time to make her Thank Yous which fit in perfectly to our next challenge over on the Cut It Up challenge blog.
This time I did a hybrid - part digi and part paper layers. I removed a couple layers on the digi invite and then printed them all out. I cut them out, Inked the edges and mounted them on turquoise cardstock (I did the same thing with the invites too.) Next I designed the "Thanks" in MTC and I cut the shadow layer from white and the Thanks layer in pink using my Black Cat cutter. I inked my edges, adhered them to the card fronts and then added 3 little Pezablings in the bottom right corner.
Prizes up for grabs for the current CIU challenge - $5 gift certificate to Digital Delights by Louby Lou! So come join us - work on your Christmas thank yous and be ahead of the game! Don't forget to stop by the CIU Blog to see what the rest of the design team has created!
I hope y'all had a wonderful Turkey day and stuffed yourselves silly! I know I did - on both counts! We headed to the in-laws for lunch and then a friend's house afterward for a bit. So shopping for me as I think all of the stores should stay closed on Thanksgiving! Plus it ruins the insanity of Black Friday - I liked it better when it ALL started at 4am on Friday. I was a faithful participant for ages but now it seems lacking. I can't go out anyway this year as Kevin cannot watch Pezza and I am not bringing her out in that. She is not a good shopping companion on a normal trip! The only thing I am planning to do is take advantage of the 50% of entire purchase from noon - 10pm at Michaels. I have been wanting to add to my acrylic paint stash and those little tubes can run as much as $10+!
Little Miss Pezza Lou Who turned 7 this month (and we all lived to tell about it!) I decided to go the digital route for her party invitations - easier to mass produce! I used the It's Your Big Day collection from Sweet Shoppe and put these together:
Then it came time to make her Thank Yous which fit in perfectly to our next challenge over on the Cut It Up challenge blog.
This time I did a hybrid - part digi and part paper layers. I removed a couple layers on the digi invite and then printed them all out. I cut them out, Inked the edges and mounted them on turquoise cardstock (I did the same thing with the invites too.) Next I designed the "Thanks" in MTC and I cut the shadow layer from white and the Thanks layer in pink using my Black Cat cutter. I inked my edges, adhered them to the card fronts and then added 3 little Pezablings in the bottom right corner.
Prizes up for grabs for the current CIU challenge - $5 gift certificate to Digital Delights by Louby Lou! So come join us - work on your Christmas thank yous and be ahead of the game! Don't forget to stop by the CIU Blog to see what the rest of the design team has created!
Wednesday, November 20, 2013
A traveling journal page!
Hi all!
I have finished up the last two traveling journals I have been working on this year with a group of friends from Ireland - this means mine should be making it's return to me soon!
The focus of this journal is the color yellow. I began similar to a previous post and used sequin waste as a stencil with a Viva Decor product called crystal gel - it is a shimmering gel with iridescent flakes in it. I also sponged on Oyster Silks through a plant - like stencil.
Next I mixed up some shimmering mists - I prefer to make my own using Luminarte Primary Elements Artist Pigment Powders. I like the ease of choosing my colors on a whim and the fact that is less expensive to buy the color & shimmer ONCE in the form of a powder and then use that to make a variety of different mediums. For this piece I mmixed up a yellow of course and then I also used a blue. You can see the way the two different stenciled designs show through by resisting the spray and making it pool around the designs.
I wanted to add a bit more to it so I took the same plant-like stencil and sponged on one of the newest Silks colors - Moss Green. I like to mimic and repeat colors and elements to bring some of the chaos together - since I get a little chaotic - in art AND in life! I felt like it needed a bit of a punch at the end so I grabbed my Heavy Gel Medium and some Apple Blossom Primary Elements and mixed well (see what I mean folks? This stuff is so versatile!) I smoothed it on through another stencil - the Harlequin - in a few spots. The stencils I used here are from Crafter's Workshop.
Just look at that shimmer - the Apple Blossom gel medium GLOWS and the shimmering mists I used as my base just shimmer along with the Moss Green Silks plant stenciled on. LOVE this stuff.
Stencils are one of my favorite things - I am toying with making some of my own but I am also really coveting Stencil Girl stencils right now. I swear I could probably easily spend $100 or more! Great stuff! Y'all need to check them out!
I have finished up the last two traveling journals I have been working on this year with a group of friends from Ireland - this means mine should be making it's return to me soon!
The focus of this journal is the color yellow. I began similar to a previous post and used sequin waste as a stencil with a Viva Decor product called crystal gel - it is a shimmering gel with iridescent flakes in it. I also sponged on Oyster Silks through a plant - like stencil.
Next I mixed up some shimmering mists - I prefer to make my own using Luminarte Primary Elements Artist Pigment Powders. I like the ease of choosing my colors on a whim and the fact that is less expensive to buy the color & shimmer ONCE in the form of a powder and then use that to make a variety of different mediums. For this piece I mmixed up a yellow of course and then I also used a blue. You can see the way the two different stenciled designs show through by resisting the spray and making it pool around the designs.
I wanted to add a bit more to it so I took the same plant-like stencil and sponged on one of the newest Silks colors - Moss Green. I like to mimic and repeat colors and elements to bring some of the chaos together - since I get a little chaotic - in art AND in life! I felt like it needed a bit of a punch at the end so I grabbed my Heavy Gel Medium and some Apple Blossom Primary Elements and mixed well (see what I mean folks? This stuff is so versatile!) I smoothed it on through another stencil - the Harlequin - in a few spots. The stencils I used here are from Crafter's Workshop.
Just look at that shimmer - the Apple Blossom gel medium GLOWS and the shimmering mists I used as my base just shimmer along with the Moss Green Silks plant stenciled on. LOVE this stuff.
Stencils are one of my favorite things - I am toying with making some of my own but I am also really coveting Stencil Girl stencils right now. I swear I could probably easily spend $100 or more! Great stuff! Y'all need to check them out!
Friday, November 15, 2013
CIU is Counting down!
Hi all!
Today marks the start of the next challenge on the Cut It Up Challenge Blog! The challenge is to make some sort of Advent or countdown project - I must say the design team really out did themselves! Once you reach the end of this post I encourage you to go to the Challenge Blog and check out what the rest of the ladies made!
I decided to make a countdown calendar Pez could mark off as each day passsed:
Kadoodle Bug Designs is one of our sponsors for this challenge ($10 Gift Certificate) and she has a fantastic photo tag set cut file (along with LOTS of other wonderful cut files!) I cut it out extra large - it's about 8 inches high or so! Then I made the countdown box in Word. All of my edges are inked with my go-to inks - Tsukineko Brilliance dew drops.
I wanted to give his hat a little pizzazz so I added some embellies - the other sponsor for this challenge is ME! Yep - a $25 dollar gift certificate to shop on my website Pezadoodle Designs. It is STILL up and running and has the last of my inventory ALL at 40% OFF - including the extremely versatile Pezabling sparkling squares like I used here on his hat. You really can't beat that! I also gave him a little clay poinsettia embellishment - these are super easy to make and you can watch Pezza show you how in this video:
Now head on over to the CIU challenge blog and see what the rest of the team has created and then enter a creation of your own!!! I would also love it if you head on over to my website and do some shopping! Pezadoodle Designs has great original rubber stamps as well as a variety of other things!
Today marks the start of the next challenge on the Cut It Up Challenge Blog! The challenge is to make some sort of Advent or countdown project - I must say the design team really out did themselves! Once you reach the end of this post I encourage you to go to the Challenge Blog and check out what the rest of the ladies made!
I decided to make a countdown calendar Pez could mark off as each day passsed:
I wanted to give his hat a little pizzazz so I added some embellies - the other sponsor for this challenge is ME! Yep - a $25 dollar gift certificate to shop on my website Pezadoodle Designs. It is STILL up and running and has the last of my inventory ALL at 40% OFF - including the extremely versatile Pezabling sparkling squares like I used here on his hat. You really can't beat that! I also gave him a little clay poinsettia embellishment - these are super easy to make and you can watch Pezza show you how in this video:
Thursday, November 7, 2013
Kids Mixed Media part 2
Hi all!
I can't' believe it's Thursday! We had Monday and Tuesday off here AND the time changed - I am all sorts of throw out of whack! Add prep for Hollyn's birthday party and the 3 ringworm circus of kittens that have been quarantined in my studio for over a month and EGADS!
Today is also my last Kids Mixed Media class so they are taking home the other 2 projects they did. The second one is a Christmas wall hanging:
This is my sample. We started with a wooden circle and covered it with crumpled tissue paper. Then I had them paint reds and greens over it. Once dry, we added gold or silver paint BUT I had them apply it using Saran Wrap. they thought that was CRAZY! hahahah!
Next we painted a wooden Christmas tree shape green. Then I brought in some Gel Medium and my favorite of ALL art supplies - Luminarte Primary Elements Artist Pigment Powders. If you have not discovered these little jars of awesome you are missing out! They are pure pigment and gorgeous shimmer packed into a powder form allowing you the ultimate in versatility. They can be mixed with any medium to give you what you want. In this case they mixed the Powder with the Gel Medium for a gorgeous, semi-transparent, shimmering green gel. They spread it on the painted trees and embedded a variety of Christmas buttons, Christmas gems and silver and gold beads into it. SO VERY COOL! They were amazed!
I brought them home to adhere the trees onto the boards, add the felt snowflake and little pine cone cluster and put the twine hanger on. Fun stuff!
I can't' believe it's Thursday! We had Monday and Tuesday off here AND the time changed - I am all sorts of throw out of whack! Add prep for Hollyn's birthday party and the 3 ringworm circus of kittens that have been quarantined in my studio for over a month and EGADS!
Today is also my last Kids Mixed Media class so they are taking home the other 2 projects they did. The second one is a Christmas wall hanging:
This is my sample. We started with a wooden circle and covered it with crumpled tissue paper. Then I had them paint reds and greens over it. Once dry, we added gold or silver paint BUT I had them apply it using Saran Wrap. they thought that was CRAZY! hahahah!
Next we painted a wooden Christmas tree shape green. Then I brought in some Gel Medium and my favorite of ALL art supplies - Luminarte Primary Elements Artist Pigment Powders. If you have not discovered these little jars of awesome you are missing out! They are pure pigment and gorgeous shimmer packed into a powder form allowing you the ultimate in versatility. They can be mixed with any medium to give you what you want. In this case they mixed the Powder with the Gel Medium for a gorgeous, semi-transparent, shimmering green gel. They spread it on the painted trees and embedded a variety of Christmas buttons, Christmas gems and silver and gold beads into it. SO VERY COOL! They were amazed!
I brought them home to adhere the trees onto the boards, add the felt snowflake and little pine cone cluster and put the twine hanger on. Fun stuff!
Tags:
luminarte,
mixed media,
primary elements
Monday, November 4, 2013
Mixed Media for kids!
Hi all!
Happy Monday - BLAH! Though I DO like the time change. I operate better with this time schedule. Pezza has today and tomorrow off so the teachers can have parent conferences. Parenting has not been stellar this weekend either let me tell ya. MAN this shit's hard! And grown kids are not easier sometimes. Harder in some ways. It is hard to let them "write their own stories" when I have the benefit of so much hindsight. But then I sure didn't listen to a thing my parents said either - honestly, I still don't so there ya go! Yesterday I liked 1 out of 3 kids :P hahha! Today Pezza is off of school - teacher work days today and tomorrow. We went out and ran errands together and she was perfectly enjoyable. However I remember why I don't take her on errands - every place we went I needed 1-2 things and she got 8 or 10 :P
I caved and decided to teach my kids' mixed media class after school again at Pezza's school. This time I left out the Kindergartners. I had a couple repeat students and lots of new ones! 11 kids total! I came up with 3 projects again but this time very different ones. Our last class is this week and pretty much all of my creative time has been spent on prep for the classes each week. Last week they finished one of their projects so I thought I would share it with y'all. Here is my prototype/sample:
Each student decorated their initial!
We started with big wooden initials and they put crumpled tissue paper on with Mod Podge. Then I gave them a variety of chipboard items to glue on plus a big cardboard shape. I had some pre-cut chipboard pieces plus some pieces I cut myself from cereal boxes using sizzix dies. I showed them how to peel off the top layer of cardboard to reveal the stripe-y texture underneath
Next they painted them one solid color - complete coverage. Then I brought in my Viva Colour Inka Gold and let them each choose a color and showed them how to spread it on thinly with their finger tips to reveal the texture and detail of all the things they glued onto the letters.
For the final layer I brought in a great mix of beads, sequins and glitter. I went with clear and white so it matched with all of them as I had limited funds to spend and couldn't get a different mix for each and estimate how much was needed, etc.
Again they used Mod Podge and added the bead mix however they wanted - some were more free-wheeling like I did with mine and others were more controlled. The Mod Podge is still wet in these pics so it looks white but of course will dry clear!
I think all the kids did such a great job! They really seemed to enjoy the work and were pleased with their projects.
I had two boys in my class and the boys are a bit more challenging. Girls are easy - it's all hearts, flowers, glitter and bling. So for the boys I had brought in gear shapes and stars. Then instead of beads, sequins and glitter they got crushed shells and sand from my trip to Myrtle Beach - they were quite pleased! This week however will be another challenge. We are finishing little boxes. The girls will be gluing jewels to the tops of theirs. What on earth can I give the boys??????
Happy Monday - BLAH! Though I DO like the time change. I operate better with this time schedule. Pezza has today and tomorrow off so the teachers can have parent conferences. Parenting has not been stellar this weekend either let me tell ya. MAN this shit's hard! And grown kids are not easier sometimes. Harder in some ways. It is hard to let them "write their own stories" when I have the benefit of so much hindsight. But then I sure didn't listen to a thing my parents said either - honestly, I still don't so there ya go! Yesterday I liked 1 out of 3 kids :P hahha! Today Pezza is off of school - teacher work days today and tomorrow. We went out and ran errands together and she was perfectly enjoyable. However I remember why I don't take her on errands - every place we went I needed 1-2 things and she got 8 or 10 :P
I caved and decided to teach my kids' mixed media class after school again at Pezza's school. This time I left out the Kindergartners. I had a couple repeat students and lots of new ones! 11 kids total! I came up with 3 projects again but this time very different ones. Our last class is this week and pretty much all of my creative time has been spent on prep for the classes each week. Last week they finished one of their projects so I thought I would share it with y'all. Here is my prototype/sample:
Each student decorated their initial!
We started with big wooden initials and they put crumpled tissue paper on with Mod Podge. Then I gave them a variety of chipboard items to glue on plus a big cardboard shape. I had some pre-cut chipboard pieces plus some pieces I cut myself from cereal boxes using sizzix dies. I showed them how to peel off the top layer of cardboard to reveal the stripe-y texture underneath
Next they painted them one solid color - complete coverage. Then I brought in my Viva Colour Inka Gold and let them each choose a color and showed them how to spread it on thinly with their finger tips to reveal the texture and detail of all the things they glued onto the letters.
For the final layer I brought in a great mix of beads, sequins and glitter. I went with clear and white so it matched with all of them as I had limited funds to spend and couldn't get a different mix for each and estimate how much was needed, etc.
Again they used Mod Podge and added the bead mix however they wanted - some were more free-wheeling like I did with mine and others were more controlled. The Mod Podge is still wet in these pics so it looks white but of course will dry clear!
I think all the kids did such a great job! They really seemed to enjoy the work and were pleased with their projects.
I had two boys in my class and the boys are a bit more challenging. Girls are easy - it's all hearts, flowers, glitter and bling. So for the boys I had brought in gear shapes and stars. Then instead of beads, sequins and glitter they got crushed shells and sand from my trip to Myrtle Beach - they were quite pleased! This week however will be another challenge. We are finishing little boxes. The girls will be gluing jewels to the tops of theirs. What on earth can I give the boys??????
Friday, November 1, 2013
Giving thanks....new Cut It Up challenge
Hi all!
I hope y'all all had a scary night of trick or treating! We had some friends over for pizza and then headed out. Each year Pezza covers a little more ground. Eventually we'll be doing the whole neighborhood!
She had a blast but she was tired this morning! She usually gets up on her own but today I had to go in and wake her up. When I went in to her room I said Pezza....and she said NO! But we managed to get ready in time and then we went to the door to leave and it was pitch black outside! I had to check the clock 3 times to make sure we had the time right!
Today kicks off a new challenge over on Cut It Up - the challenge is to do a Thanksgiving project and of course you must use a die cut. The prize up for grabs - Stampin' Up! goodies from Norma Pimentel. I have been using this design team position to do some scrapbooking - it's been a great motivator for me but I paused on this challenge - you can only have so many layouts of a turkey dinner KWIM? And then I had an idea and came up with this instead:
I decided to do a snapshot of what we are all thankful for right now. I had Pezza write hers out and the rest of us typed ours up. It's so cute to look back on little kid hand writing and how they lay things out!
I got my cut files from Designs on Cloud Nine - they are part of a set that includes some ADORABLE owls I am hoping to have time for soon! I cut it all out on my Black Cat using Make the Cut software.
I gave my acorns some texture with an embossing folder and ink. Then I wanted to give my leaves some pizzazz and I knew the new Silks Acrylic Glaze colors would be perfect! Especially if I applied it using Saran Wrap.
You can see the shimmer here - the orange leaves have Chestnut Brown, the yellow leaves have one of my all time FAVE Luminarte colors, Golden Monarch, and the burgandy leaves have one of the amazing new Iridescents, Copper.
I hope y'all can join us for the challenge on Cut It Up! Head over to the blog and check out the rest of the Design Team's projects!
She had a blast but she was tired this morning! She usually gets up on her own but today I had to go in and wake her up. When I went in to her room I said Pezza....and she said NO! But we managed to get ready in time and then we went to the door to leave and it was pitch black outside! I had to check the clock 3 times to make sure we had the time right!
Today kicks off a new challenge over on Cut It Up - the challenge is to do a Thanksgiving project and of course you must use a die cut. The prize up for grabs - Stampin' Up! goodies from Norma Pimentel. I have been using this design team position to do some scrapbooking - it's been a great motivator for me but I paused on this challenge - you can only have so many layouts of a turkey dinner KWIM? And then I had an idea and came up with this instead:
I decided to do a snapshot of what we are all thankful for right now. I had Pezza write hers out and the rest of us typed ours up. It's so cute to look back on little kid hand writing and how they lay things out!
I got my cut files from Designs on Cloud Nine - they are part of a set that includes some ADORABLE owls I am hoping to have time for soon! I cut it all out on my Black Cat using Make the Cut software.
I gave my acorns some texture with an embossing folder and ink. Then I wanted to give my leaves some pizzazz and I knew the new Silks Acrylic Glaze colors would be perfect! Especially if I applied it using Saran Wrap.
You can see the shimmer here - the orange leaves have Chestnut Brown, the yellow leaves have one of my all time FAVE Luminarte colors, Golden Monarch, and the burgandy leaves have one of the amazing new Iridescents, Copper.
I hope y'all can join us for the challenge on Cut It Up! Head over to the blog and check out the rest of the Design Team's projects!
Tags:
black cat,
cut it up,
designs on cloud 9,
LOs,
luminarte,
make the cut,
silks
Subscribe to:
Posts (Atom)


